How to Download All Photos and Videos from Facebook?
The average American spends over 30 mins daily on Facebook. 9% of millennials have quit, citing privacy, drama, and politics (exacerbated by fact-checker changes). To leave, download data first to save photos/videos before deleting your account.
- Author: Shine
- Update: May 29, 2025

How to Download All Photos and Videos

Social media platform for connecting and sharing with people globally.
While manual downloads of photos and videos are possible, Facebook’s built-in tool outperforms third-party apps. Follow these 9 simple steps to effortlessly download all your content in one organized batch.
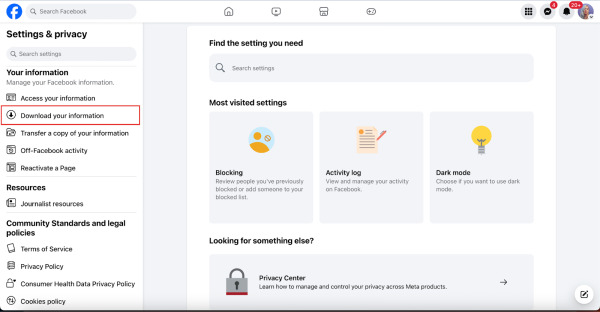
Step 1: Access Facebook Settings
Log into your Facebook account and go to Settings.
You can find Settings via Profile > Settings, or click this link for direct access.

Step 2: Locate the ‘Download Your Information’ Tool
In the left-hand menu, scroll down to the Your Information section. Under this header, click Download Your Information.
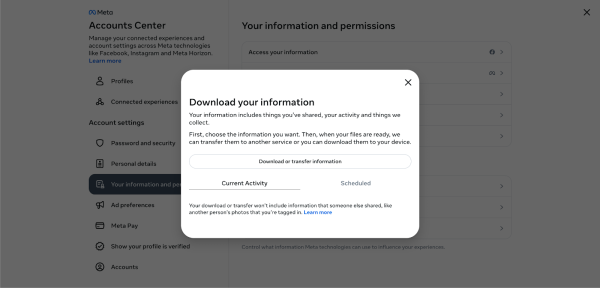
A modal window will appear, outlining the information you’re about to download. Facebook will first prepare your data; once packaged, you’ll be able to retrieve it.
This includes all photos, videos, messages, and text posts associated with your account.
Click Download or transfer information to proceed.
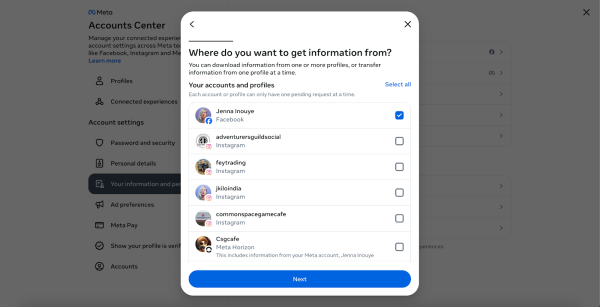
Step 3: Choose Accounts to Save
Next, Facebook will prompt you to select which accounts to download, including your Facebook and Instagram accounts.
Check the box next to each account you want to save.
Click Next.
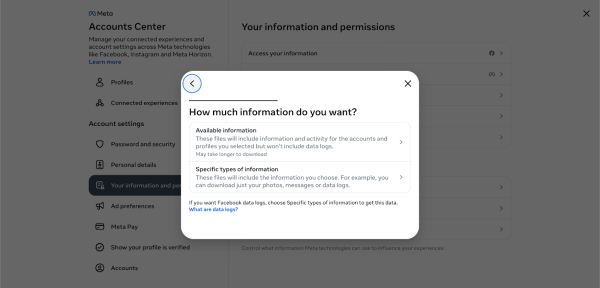
Step 4: Select Data to Save
After choosing your accounts, Facebook will ask how much information you want to download. You have two options:
Available Information:
This is the default choice, including photos, messages, and posts (but not data logs). Select this if you want a comprehensive backup of your content.
Specific Information:
Use this to manually choose which data to download (e.g., only photos and videos). Ideal for targeted backups.
Choose your preference and click Next.
If you choose Available Information:
Skip to Step 5 directly, as this option includes a pre-selected bundle of content (photos, messages, posts, etc.).
If you choose Specific Types of Information:
You’ll see a screen to manually select data categories, such as:
Messages
Posts
Friends & Followers
Preferences
Ads
Data Logs (detailed records of your activity and preferences)
Select the categories you need and click Next.

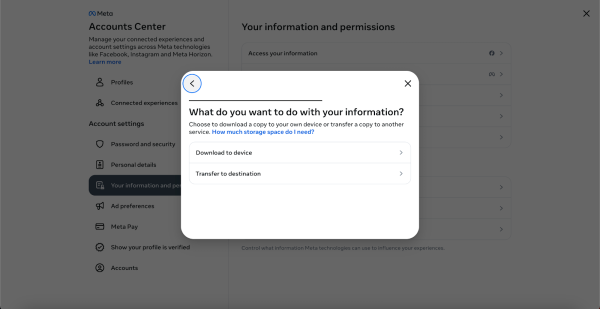
Step 5: Choose Your Delivery Method
After selecting your data, decide how to receive it. Facebook offers two options:
Download to Device:
Save files directly to your computer or mobile device. Ideal for manual backups.
Transfer to Destination:
Send files directly to Google Drive or Dropbox for cloud storage.
Select Download to Device to proceed to file creation, or choose Transfer to Destination for cloud transfer.
Step 6:Transfer Your Photos and Videos to a Destination
Instead of downloading your information to your device, you can transfer it directly to a location. You can either transfer it to your Google Drive or to your Dropbox.
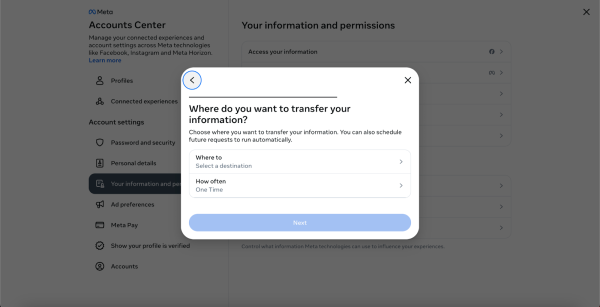
When Selecting ‘Transfer to Destination’
Facebook will prompt you to answer two questions:
Destination: Choose between Google Drive or Dropbox.
Frequency: Select how often you want the transfer to occur (e.g., One Time, Weekly). Recurring transfers are ideal for ongoing data backups.
After selecting a destination, you’ll need to connect your cloud storage account to Facebook.
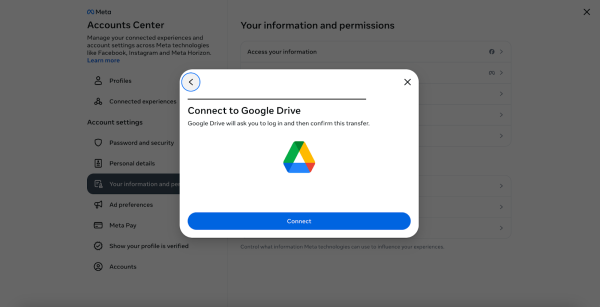
Click “Connect” and log into your Google Drive or Dropbox account.
Step 7) Prepare Your Download
Whether you’ve selected “Download to Device” or “Transfer to Destination,” you should now be at the download tool.
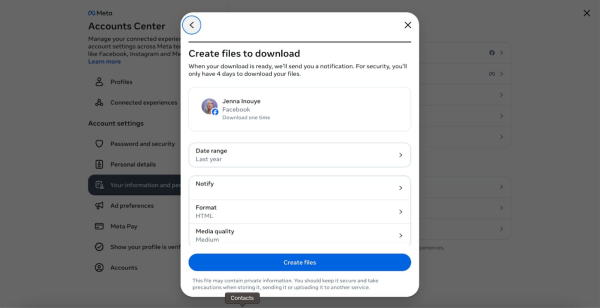
Here, select the Date Range for your download (e.g., “Last Week” to “All Time”). Additional options include:
Notify: Enter the email address where Facebook will send a completion alert.
Format: Choose HTML or JSON for post information formatting.
Media Quality: Select High, Medium, or Low (high quality may take longer to process).
After configuring these settings, click Create Files.
Step 8) Wait for Your Download
Facebook doesn’t immediately provide your download. Instead, it has to package and prepare the download.
Once you’ve gone through the above steps, you’ll be brought back to the “Download Your Information” tool.
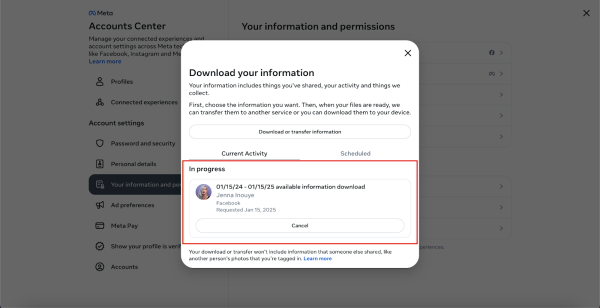
However, now there’ll be something new.
At the bottom, you’ll see an “In Progress” information download. Here, you can cancel the download or wait for it to be complete.
Once your download is complete, you’ll be emailed by Facebook at your “Notify” email address.
Step 9) Download Your Facebook Photos and Videos
When your download is ready, you’ll be able to download it directly from the “Download Your Information” tool.
Click the “Download” button to save your information.
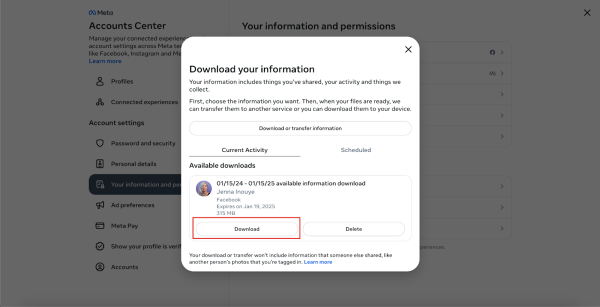
It's been a long journey, but it's finally done. Once you've downloaded your package, you'll have all your photos and videos as a zipped file that you can then extract.
How to Download and Edit Individual Photos and Videos
Suppose you need to download and edit individual photos and videos from your account.
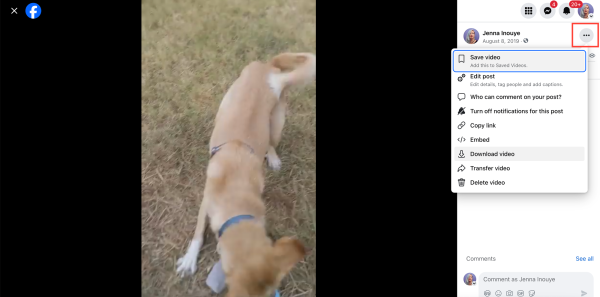
First, navigate to your Profile, then click on Photos or Videos.

Click on the photo or video that you want to save. To the right, you will see three dots: