How to Forward an Email in Gmail?
Forwarding emails is a key function enabling easy message sharing. Gmail, with over 1.8 billion active users and 300+ billion weekly emails, offers simple tools for this. So, being able to forward an email in Gmail with just a few clicks matters. You can forward one message or bundle several into one. It's as easy as bulk - deleting emails in Gmail.
- Author: Shine
- Update: Apr 16, 2025

What Do We Mean by Email Forwarding?

Email, calendar, contacts, and tasks in one platform.
Email forwarding is a functionality enabling the automatic redirection of emails from one account to another. Once you configure email forwarding, new messages reaching your original inbox will be automatically dispatched to a designated forwarding address.
This proves handy for merging multiple email accounts into a single, central inbox. It also ensures you don't overlook crucial messages by sending them to an account you check more often.
Beyond forwarding all emails, most email services let you set up rules or filters. These allow you to forward only specific messages, depending on factors such as the sender, subject line, or email content. This gives you finer - grained control over forwarded emails, helping keep your forwarding inbox free from clutter caused by unimportant messages.
How to Forward an Email in Gmail
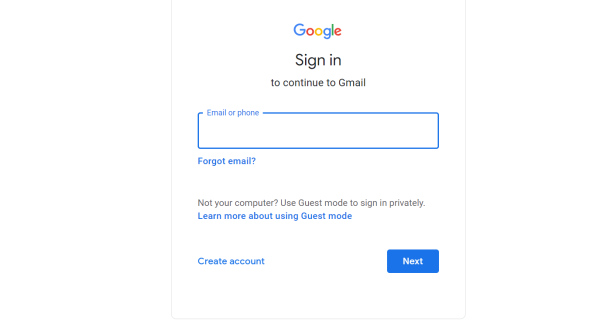
Step 1: Login Into Your Gmail Account.
First, open your web browser and go to Gmail. Input your email address and password to gain access to your inbox. In case two - factor authentication is activated, comply with the instructions provided to finish the sign - in procedure.
Step 2: Select the Email to Forward.
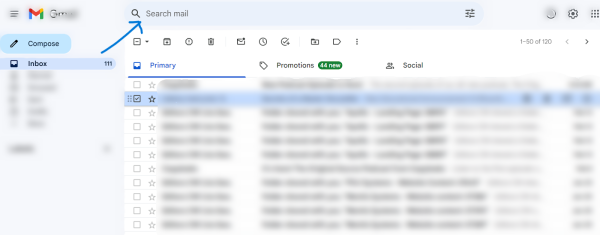
After logging in, peruse your inbox to locate the email you want to forward. You may utilize the search bar at the top. Enter keywords, sender names, or dates to search for particular emails. Then, click on the email to open it.
Step 3: Forward the Email.
Click on the email to open it. Once the email is open, in the email window, search for the three - dot (More options) menu which is positioned near the top - right corner, adjacent to the reply arrow.
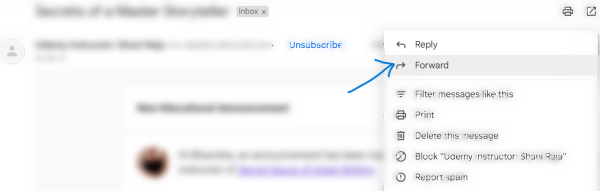
Click on the three dots to open a dropdown menu, then select "Forward."

A forwarding section will show up at the base of the email content. This is where you should type the email address(es) of the intended recipient(s) to whom you want to forward the email. In case you are forwarding to several recipients, use a comma to separate each email address.
Step 4: Add a Personal Message (Optional).
Beneath the "To" field lies the main body of the email, where the original message you're forwarding will be presented. This area serves as a space for you to include your own message or comments. It's useful for giving context or extra details to the recipient(s). For instance, you could send a reminder to your client about payment or any other relevant information. Simply click within the body and start typing to add your message.

Step 5: Review and Send the Forwarded Email.
Before hitting the send button for the forwarded email, pause for a while to carefully look over the details in the compose window. Make sure to verify that the recipient email addresses you've input are accurate. Also, ensure that any additional message you've added is straightforward and to the point.
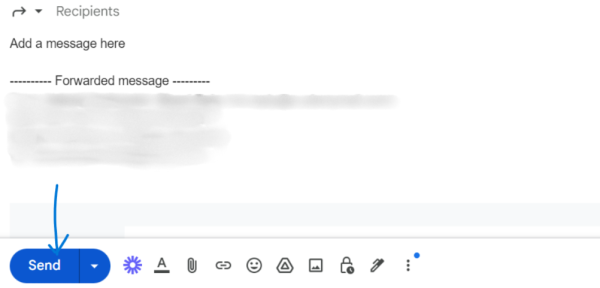
If all the details seem correct, click on the "Send" button, usually positioned at the bottom - left corner of the compose window.
By adhering to these sequential guidelines and making use of the diverse forwarding features provided by Gmail, you can forward emails in an efficient and effective manner. This way, you can keep your colleagues, friends, and family members well - informed and actively involved in crucial discussions and communications.
Advanced Email Forwarding Features in Gmail
Gmail presents a range of advanced features that offer more precise control and greater flexibility for email forwarding. These capabilities are useful for optimizing your email management, preventing important messages from slipping through the cracks, and enhancing collaboration with others. Here are some of the advanced email - forwarding features in Gmail along with detailed, step - by - step guides on how to utilize them:
Automatic Forwarding
Automatic forwarding enables you to create a rule that will automatically forward every incoming email to a designated email address. This feature comes in handy when you intend to combine multiple email accounts or are determined to ensure that no crucial messages are overlooked.
First, click on the Settings option. In Gmail, this option is indicated by a Gear icon.
Then, scroll down the page until you locate the Forwarding and POP/IMAP sections. Select the "Add a Forwarding Address" option within this section.
Next, type in the email address to which you wish to forward your Gmail emails. After entering the address, click on "Next" and proceed to follow the verification steps provided.
Once the verification is completed, choose the option that reads "Forward a copy of incoming mail" and select the email address you have just added from the available choices.
As an additional choice, you can decide whether to retain Gmail's copy of the forwarded messages or delete them right after the forwarding process.
Finally, scroll down to the bottom of the page and click on the "Save Changes" button to apply all the settings you have made.
Forwarding Filters
Forwarding filters give you the ability to automatically forward solely those specific emails that meet certain predefined conditions. For example, you can set it to forward emails from specific senders, those with particular words in the subject line, or emails that contain specific content. By using these filters, you can effectively avoid having your forwarding inbox filled with unimportant and irrelevant messages.
Launch Gmail and click on the search bar. This will enable you to access the advanced search options available.
Input the specific criteria for the emails that you wish to forward. For instance, if you want to forward emails from a particular sender, you can type something like "from:sender@example.com".
After entering the criteria, click on the "Create filter" button located at the bottom of the search window.
In the subsequent filter options that appear, find the checkbox next to "Forward it to" and mark it. Then, enter the email address to which you intend to forward the emails that match the set criteria.
Finally, click on the "Create filter" button once again to save the newly created forwarding filter.