How to Use Instagram Edits App?
Instagram Edits has arrived. Announced soon after the brief CapCut ban, it's Instagram’s answer to the rising need for mobile editing tools for short - form content. Built for video and image editing, it directly competes with TikTok’s editor and is Instagram’s version of CapCut.For influencers, social media managers, and everyday video creators who depend on Instagram, Edits may revolutionize their work.Here’s all you should know about Instagram Edits, covering how to use its best features and create Instagram - optimized videos.
- Author: Shine
- Update: Apr 27, 2025

What is Instagram Edits
Edits, Meta's newest offering, is designed to simplify and expedite the editing process for video and image creators on Instagram. Consider it as an addition to Instagram's existing suite of creative tools, such as Instagram Insights.
The fundamental principles of Instagram Edits are speed and ease of use. This tool empowers creators to rapidly produce content and post it directly to Instagram. Videos edited with Edits are exported without any watermarks and come with access to engagement analytics. These analytics allow you to gauge what strategies are effective and inspire you to explore new creative concepts.
During a launch call organized by Meta, product manager Tom Bender revealed that the aim of the Edits app is to perfect the fundamentals of video editing and, over time, become "the most precise and dependable mobile video editor."
How to Access Edits
Edits can now be downloaded on iOS and Android devices via the App Store and the Google Play Store. As of now, there is no desktop version of Edits, and Meta's product team has indicated that developing a desktop editor is not a top priority. Consequently, for the time being, editing can only be done on mobile devices.
A frequently asked question is whether Edits is free. The answer is affirmative. Edits can be downloaded and used at no cost. In an Instagram Q&A session soon after the app's announcement, Adam Mosseri explained further:
"I believe that in the long run, we may introduce some paid features to cover certain expenses, such as the computational costs associated with major AI features. However, generally speaking, we aim to offer as many free features as possible. This is because the more accessible creation tools are, the more content people will produce. This, in turn, will enhance Instagram, and everyone involved will benefit more."
Currently, all the editing features in Edits are free and accessible to everyone.
How to Use Instagram Edits (Creating and Posting Videos)
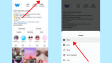
After downloading the app, you'll see a straightforward login screen. This screen will automatically connect to any Instagram accounts that are currently logged in on your device.
To log in using the recommended account, just tap the big button located in the middle of the screen. In case you want to change accounts, click on "Switch accounts" at the bottom.

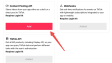
Linking the appropriate account is crucial because Edits enables you to directly publish edited videos to Instagram.
To guarantee that your content is posted to the intended profile, double - check that you are signed in to the right Instagram account.
Creating a New Project
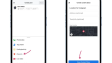
There exist two methods for commencing a new project in Instagram Edits.
Firstly, you have the option to tap the + icon, which allows you to upload images or videos from your device's camera roll.
Secondly, you can choose the recording icon to directly record content within the app itself.

Although both approaches are uncomplicated, there are several significant distinctions. When you upload files from your device, they are automatically added to a new project for editing. On the other hand, recording content directly within the app enables you to utilize real-time filters and effects, like the green screen feature, which can be applied during the recording process.
This simplifies the editing workflow and boosts the efficiency of content creation.
Now, let’s take a detailed look at the capture tools and learn how to leverage them to enhance your productivity.
Integrated Camera Tools — Green Screen, Touch-Up, and More
These tools, which can be accessed via the icon list on the left - hand side of the screen, simplify the process of capturing pre - edited content and save time during the actual editing phase.
To utilize any of these tools, all you need to do is tap on their respective icons.

Let’s take a look at each tool individually to see what they do and how to use them in your next project.
1.Music Library
The music and audio library offers an excellent means of creating videos with integrated audio. It is particularly beneficial for choreographed content such as dance videos. By choosing music from this interface, the audio will play while you're recording. This enables you to synchronize actions and scenes precisely with the rhythm of the music.

The library is handily divided into sections, making it simpler for you to locate appropriate audio. You can filter the content by "For you," "Trending," or "Original audio" to discover a wide variety of choices. In the "Trending" tab, you can even discover emerging audio clips that are in the process of becoming popular.
To incorporate your own audio into the Edits app, just tap the "Import" button at the top of the screen. This allows you to directly upload audio files from your device.
2.Green Screen
“Talking head” videos remain a highly effective format for short - form content. Whether you’re responding to a popular video, presenting your work, or providing commentary while referring to a visual aid, using the green screen tool during recording can eliminate the need for additional post - production steps.
Once you’ve activated the green screen tool, tap “Change background” to select and upload an image from your device’s camera roll. After that, you can take photos or record videos with the chosen background in place.
If you wish to change the background again, simply tap the “Change background” button once more.

For best results, make sure you're well lit and maintain a strong contrast between yourself and your physical background. Poor lighting and low contrast can reduce the effectiveness of the green screen effect.
3.Countdown
The countdown tool is uncomplicated yet extremely practical when recording content. Given that high - quality videos typically incorporate various shot styles, like handheld and fixed - position shots, employing a timer minimizes the amount of trimming required during the editing process.
Upon opening the tool, you have the option to set the countdown timer for 3, 5, or 10 seconds.
You can also modify the Clip length slider to automatically control the length of your video. The slider is measured in seconds, so you may need to make quick calculations as necessary. The longest duration you can set is 600 seconds, equivalent to 10 minutes.