RealDash - Vehicle performance tracking & customization
Transform your driving experience with stunning dashboards, real-time data, & performance metrics for every adventure.

- v2.5.6 Version
- 4.5 Score
- 472K+ Downloads
- In-app purchases License
- 3+ Content Rating


Introduction
RealDash is the ideal app for anyone looking to enhance their experience during road trips, on the streets, at the race track, or while enjoying their favorite racing simulator. With the tagline "WE DO WHATEVER WE LIKE", it offers a world of possibilities for vehicle enthusiasts.
Benefits
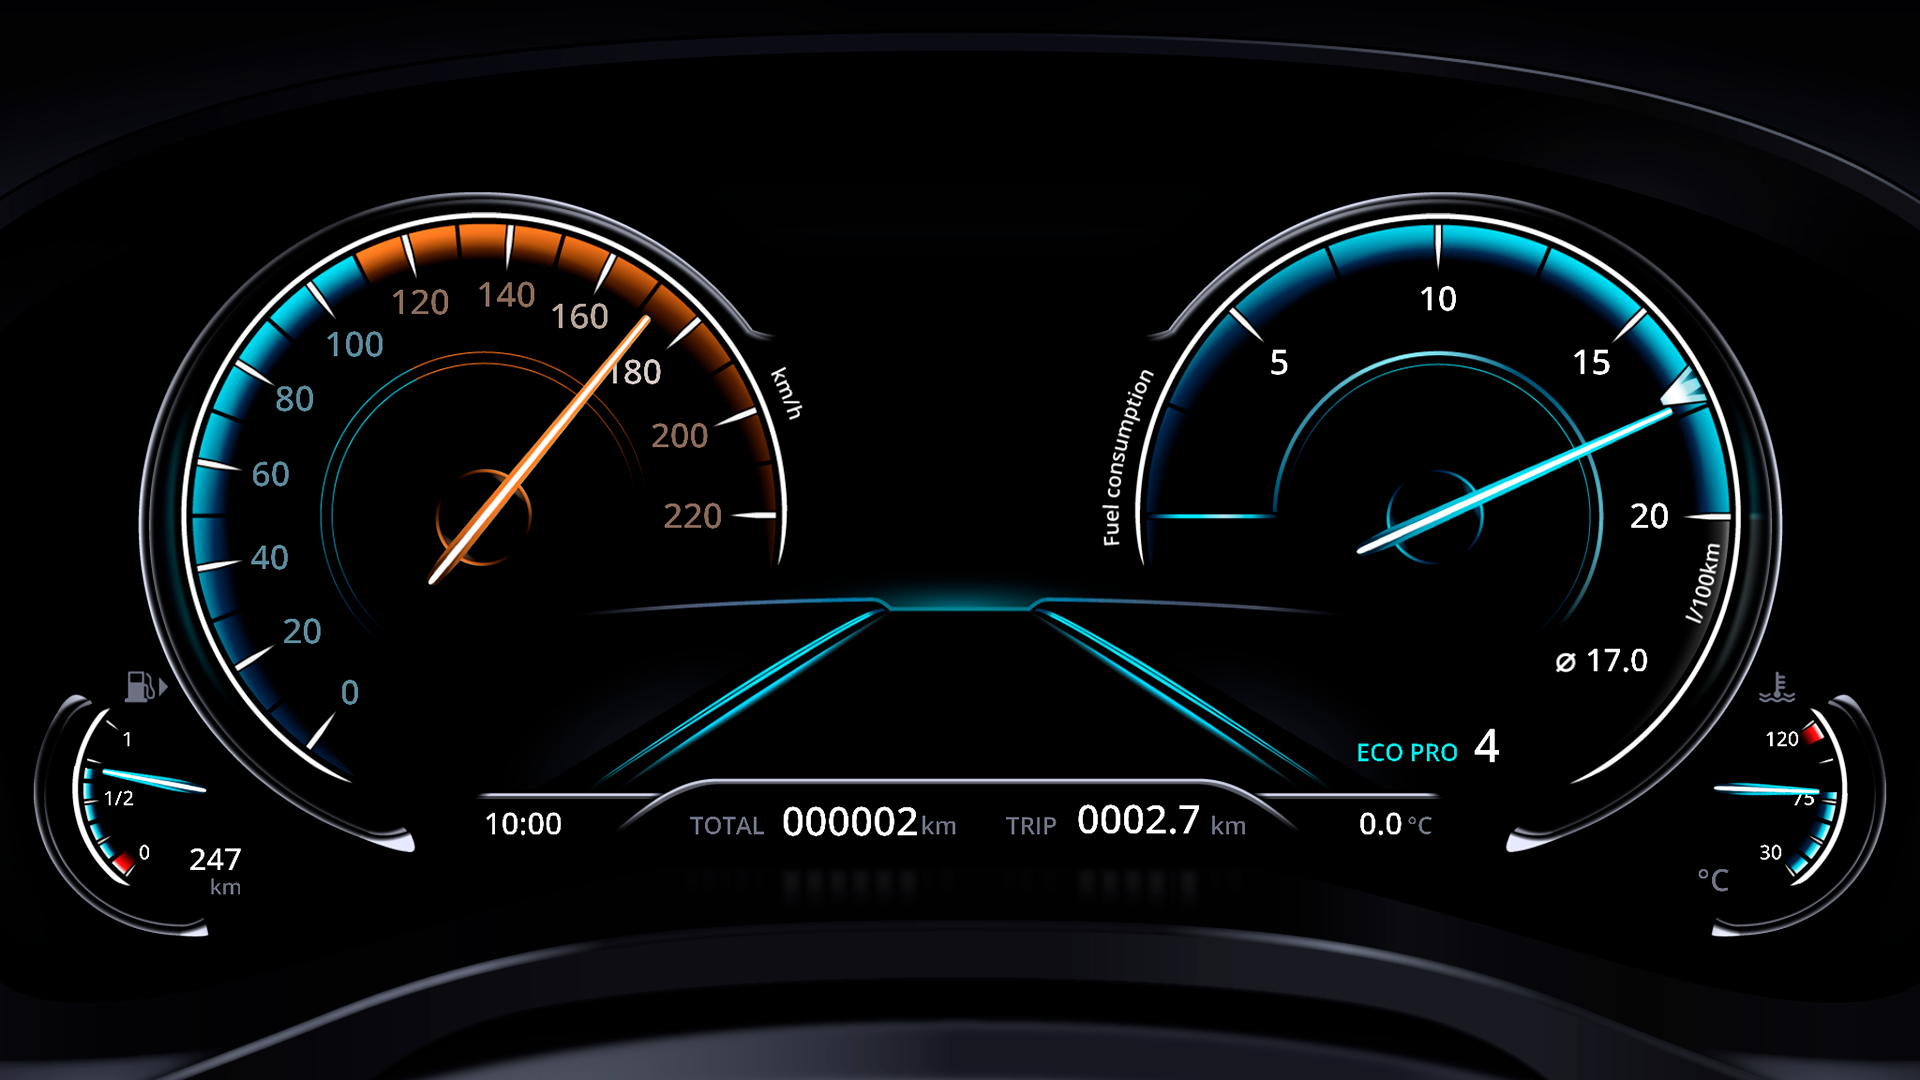
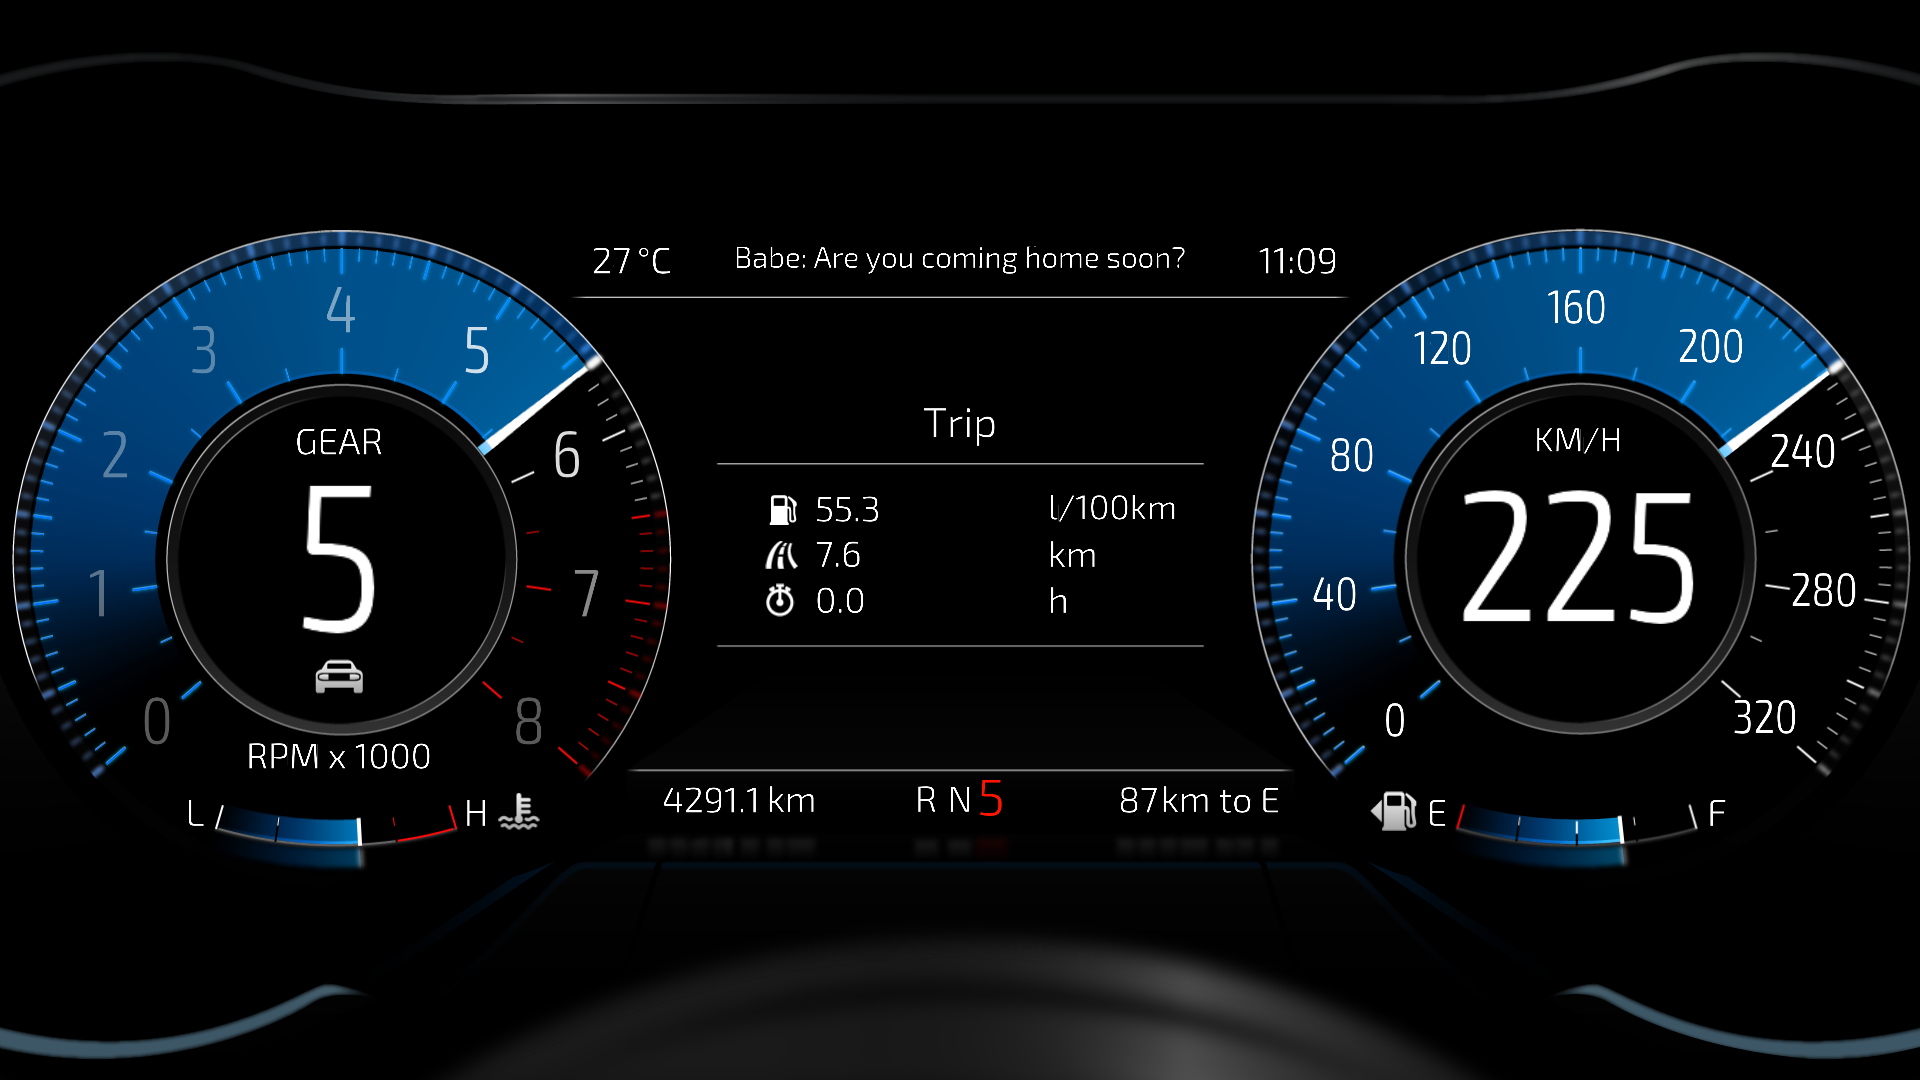
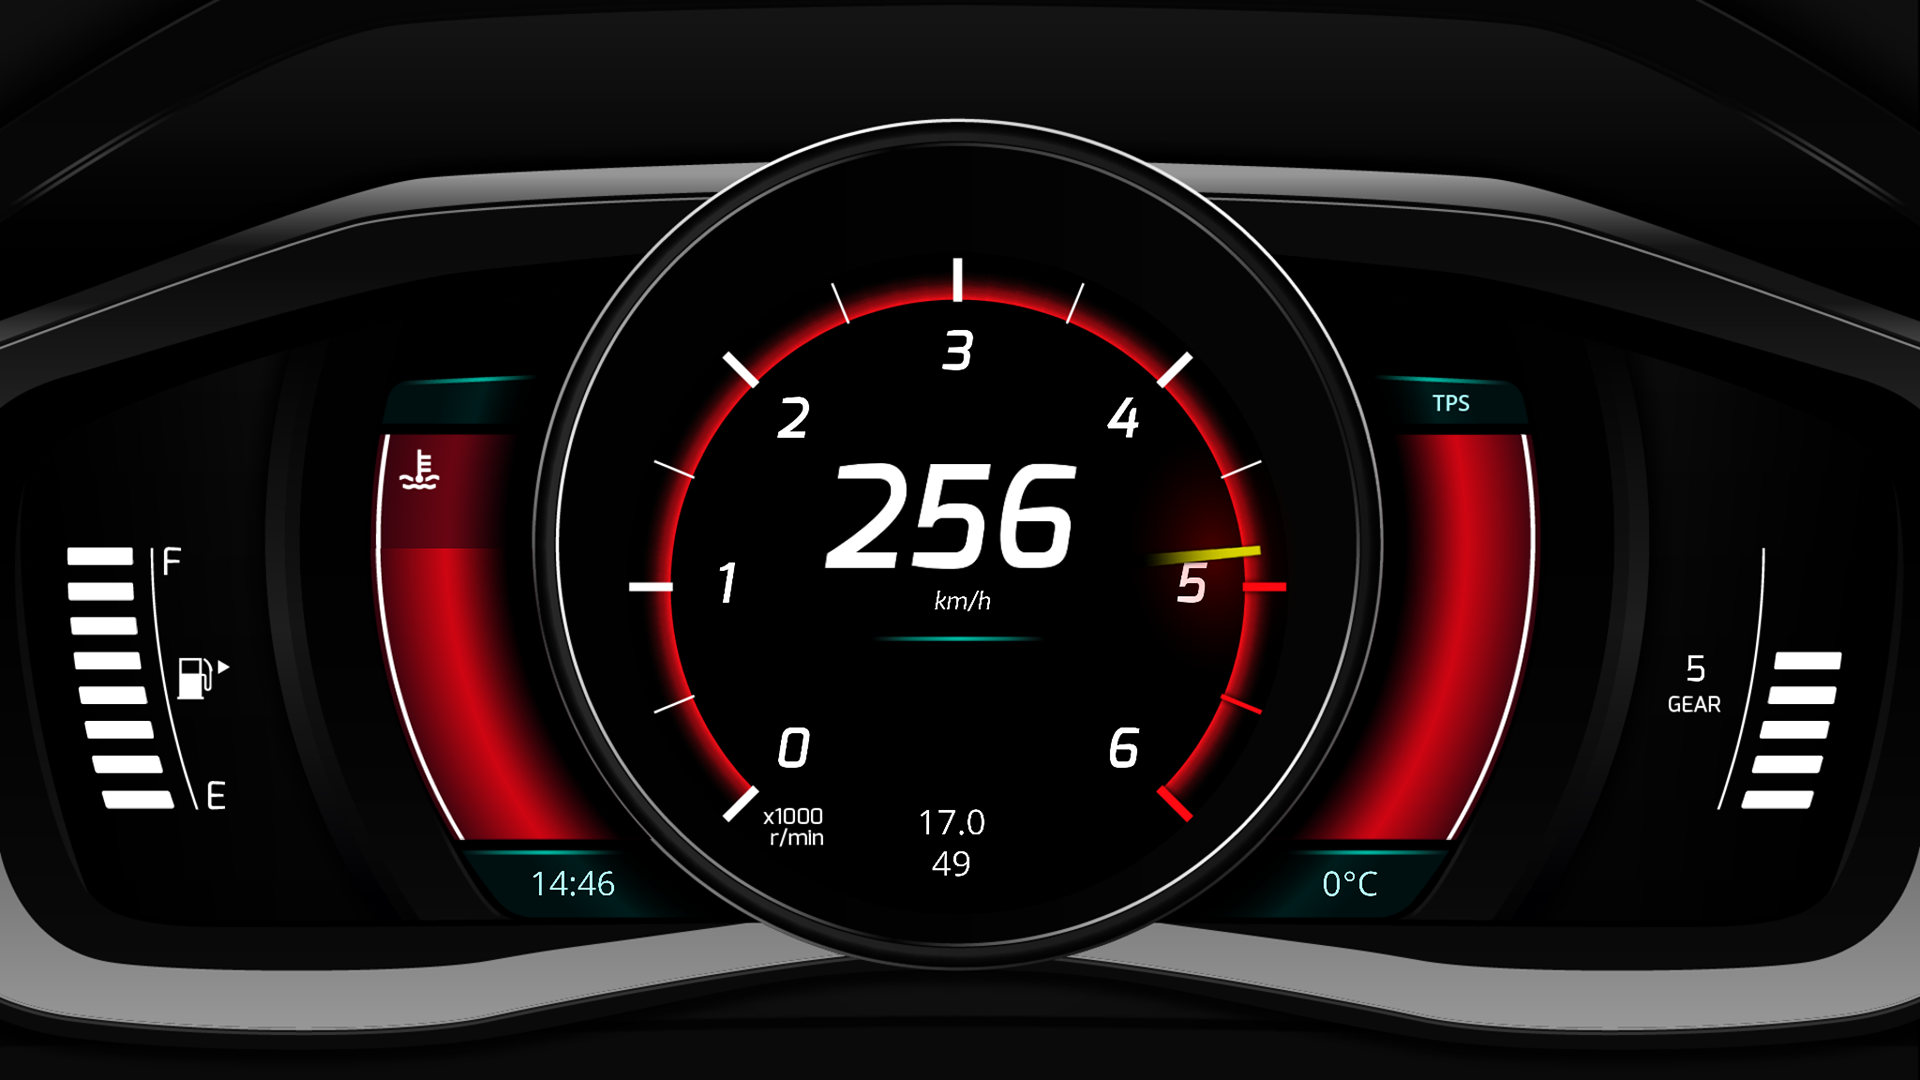
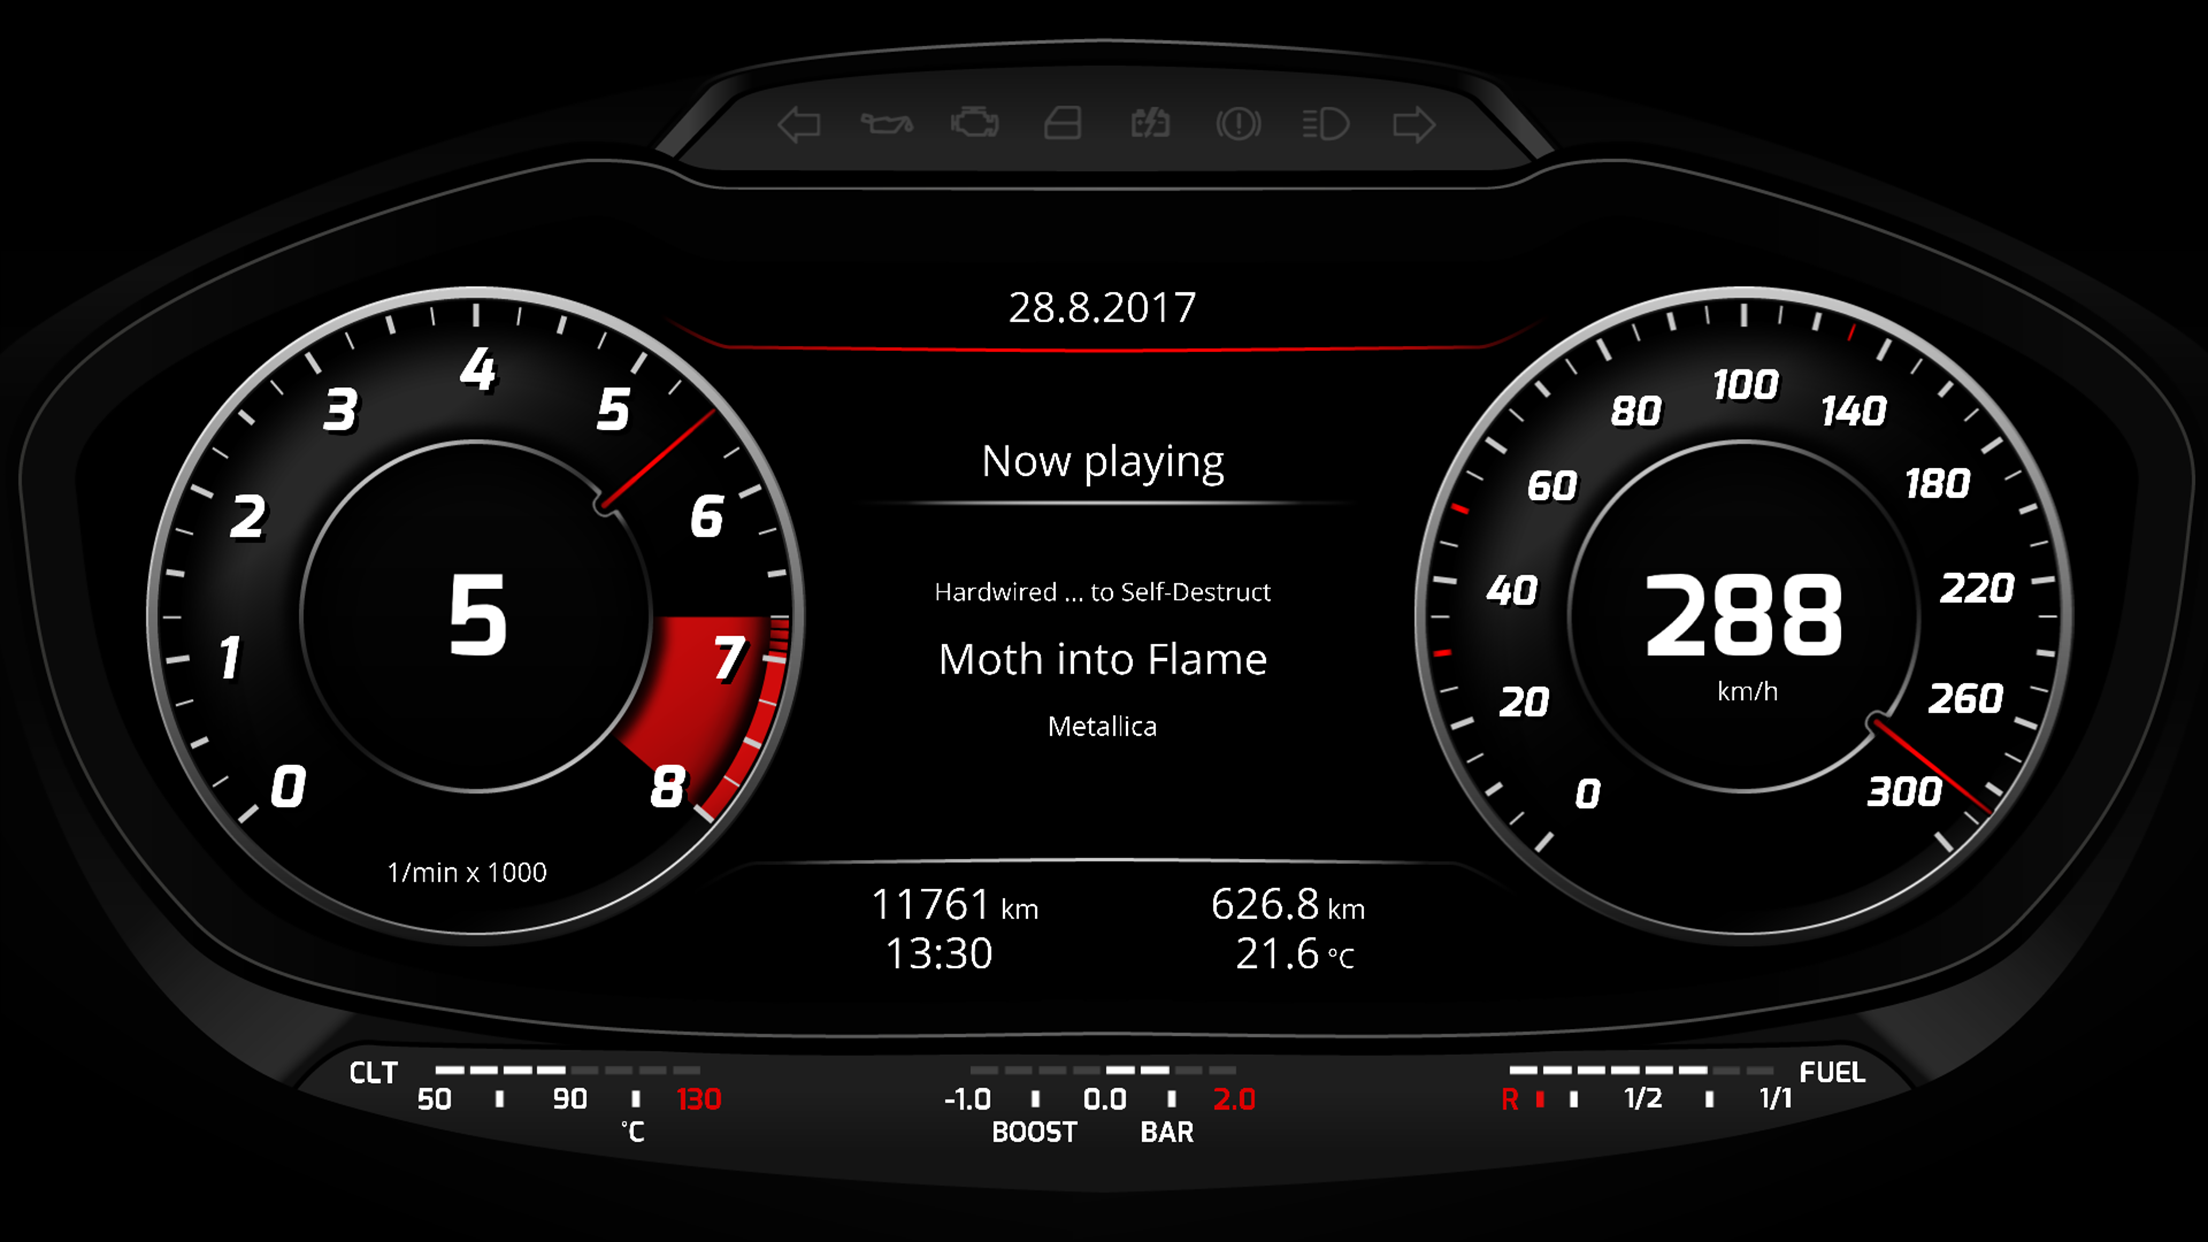
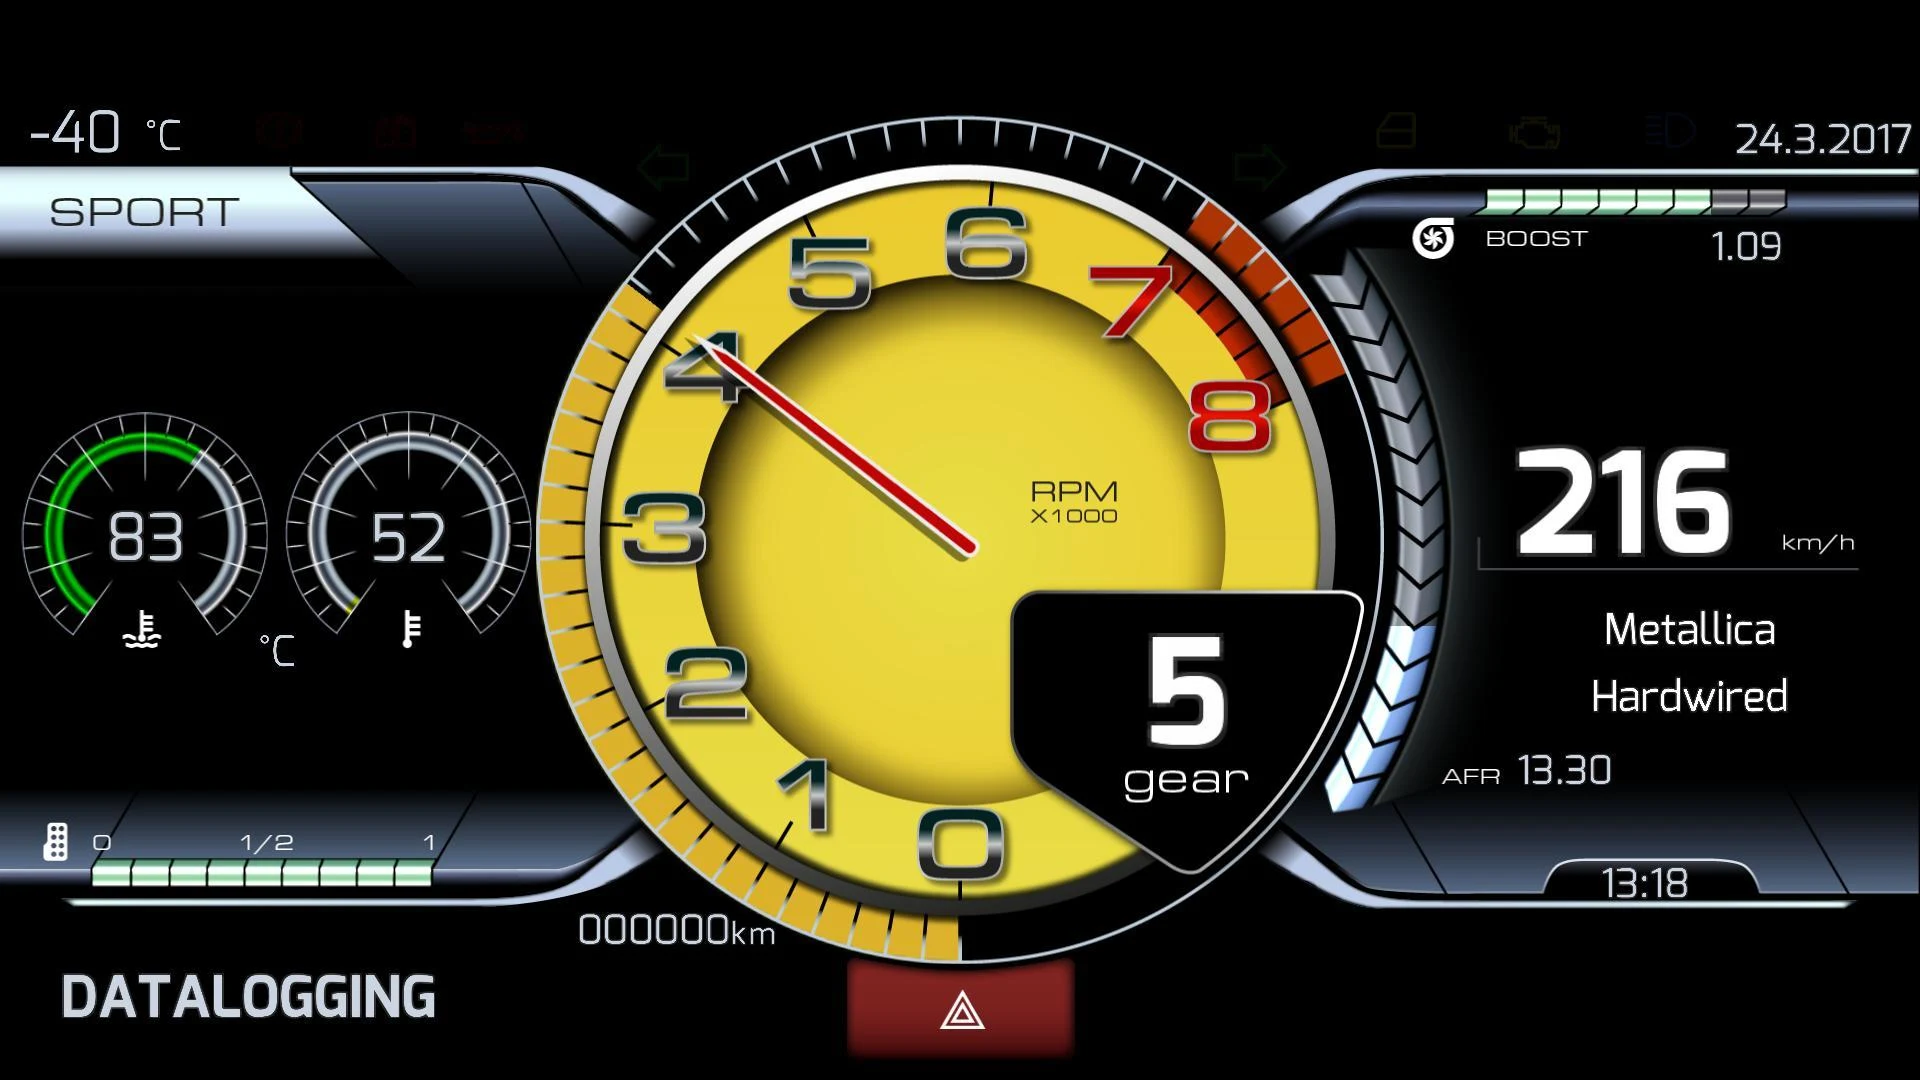
★ Customizable dashboards with Pixel Perfect™ precision—limited only by your creativity.
★ Exceptional visual quality and dynamic gauges.
★ A gallery offering both free and premium dashboards and gizmos for download.
★ Capability to read and erase vehicle error codes.
★ Displays maps and speed limits.
★ Voice command feature enables hands-free use.
★ Instantaneous and average fuel consumption tracking.
★ Performance metrics including 0-60, 0-100, 0-200 speeds, 60 feet, 1/8 mile, 1/4 mile, and a full mile.
★ Measure horsepower and torque.
★ A robust Trigger->Action system.
★ Set alarms and visual notifications based on adjustable triggers.
★ A lap timer that recognizes numerous race tracks automatically.
Supported ECUs include:
- Autronic SM4, SM2, and SMC
- CAN-Analyzer USB (7.x)
- DTAFast S-Series
- EasyEcu 3+
- Ecumaster EMU
- Hondata K-Pro, FlashPro, and S300
- Hybrid EMS
- KMS MP25 and MD35
- Link ECU (excluding G4X)
- MaxxECU
- Megasquirt models 1, 2, 3 / Microsquirt
- Motorsport-Electronics ME221
- Nissan Consult I
- OBD2 via ELM327 adapter
- Speeduino
- Spitronics ECU & TCU
- SPLeinonen PDSX-1 & DashBox
- Tatech 32 & 38
- UltraSky EMS
- Unichip
- VEMS v3
+ Support for custom hardware and DIY solutions through our open protocol.
Compatible Racing Games:
- Assetto Corsa
- BeamNG Drive
- Codemasters F1 2015-2020
- Dirt Rally
- Euro Truck Simulator 2
- Forza Horizon 4
- Forza Motorsport 7
- Gran Turismo Sport
- Gran Turismo 7
- Grid 2
- Live for Speed
- Project Cars
RealDash can function without connecting to an ECU. In this mode, GPS and built-in device sensors provide:
- Vehicle speed.
- Your current location on the map.
- Current speed limit.
- Lap timing.
- Acceleration data.
- Performance tracking (with some limitations in accuracy).
We hope you thoroughly enjoy using RealDash. Have fun!
FAQS
I have multiple Android devices, do I have to purchase full version for each device?
No. All purchases are tied into the Google user account that purchases were made with. You can use your Google account on multiple devices at the same time. Same principle applies to Apple and Microsoft stores.
I have purchased full version on Android, and now I wan't to use Windows version. Do I have to purchase full version again for Windows?
Cross selling between platforms is strictly prohibited by the rules of each store. Giving free full version for a purchase from another store would get as banned from the stores.
My Android device is listed as 'Incompatible', Why?
There is a way that you may be able to get more detailed information on why your device is listed as incompatible.
On a PC, open web browser and log-in into google with your google account.
Go to RealDash Google Play Store page
You should see green '!' with text "This app is compatible with some of your devices."
Click that, and see if your incompatible device is listed there.
There you find a small '+' sign to see more detailed information of why your device is listed as incompatible.
Why RealDash uses Internet connection?
Downloading Map tiles for map gauge
Downloading Speed limit information
Downloading Dashboards from the gallery
Checking and verifying the full version and premium dashboard purchases
For posting Leaderboard scores and Achievements (Android and iOS)
Does RealDash work without Internet connection?
Basically yes. But naturally any feature that requires Internet connection is not available. In addition RealDash must occasionally check the purchase and subscription status and you may need to enter online for that.
Why I don't see what music is playing when using Spotify on Android?
You must enable this feature from Spotify settings.
Open Spotify
Go to settings
Enable setting "Device Broadcast Status, Allow other apps on your device to see what you are listening to.
What OBD adapter do you recommend?
We don't have a specific recommendation. Try to avoid cheapest 'mini' adapters, since many of them just do not work. Well known brands in price range of $30-$100 work well and are very reliable.
Is it possible to add support for my favorite ECU?
In theory, any ECU that is capable of sending serial (USB, Bluetooth, WiFi) data can be made compatible with RealDash. Another option is to use CAN-Serial adapter, like SPLeinonen's DashBox.
What are SPLeinonen DashBox and PDSX-1? Where can I get one?
SPLeinonen is a manufacturer of specialized vehicle electronics modules, like DashBox and PDSX-1. We work in close relation with them, but are different companies, run by different people.
DashBox is a specialized module that can be used to connect virtually anything with a internal combustion engine into RealDash. It can read RPM data directly from coil, or from ECU source. DashBox can be connected to CAN BUS, and interpret CAN commands into Bluetooth connection with RealDash. In addition, DashBox contains digital and analog inputs to connect extra sensors and display their readings in RealDash.
PDSX-1 is a programmable, modular power distribution module system. Each module contains inputs and outputs, and mapping on them can be done directly from RealDash.
For more information about availablity and pricing, please contact SPLeinonen thru their facebook site: SPLeinonen on Facebook
What racetracks are supported by RealDash lap timer? How can I add new racetrack?
Currently there is no track editor in RealDash. Each track is manually entered into the app by the developers. To request a new track, do the following.
Open maps.google.com and find the racetrack you are interested of.
Pinpoint the exact location of track finish line and write down the GPS location.
If possible, note approximate heading in degrees when crossing the finish line (0 north, 90 east, 180 south, and so on).
Send us the GPS coordinate and heading, and we will add the racetrack to next update of RealDash.
List of known racetracks that RealDash detects automatically, see RealDash Discussion Forum
Connectivity
How to set up a connection?
Open Garage and tap the vehicle door.
Tap the cluster / RealDash logo.
Select 'Add' from the menu.
How to connect to OBD2?
Via Bluetooth on Android:
Just in case, Clear RealDash app data, or uninstall/install.
Turn Bluetooth on from your device and pair your ELM327 adapter with your Android device.
Open RealDash, on first start select language, and then go to 'Garage'.
Tap vehicle door and then the dashboard. Tap 'Add' on connection list.
Select 'OBD2->Bluetooth->Your ELM327 device name->' until you are in connection settings page. No need to change the settings.
Tap upper left corner 'Done'.
Exit garage back to dashboard.
RealDash will connect to your adapter in a few seconds.
Via Wifi:
Insert adapter into your vehicle OBD2 port.
Open your device WiFi settings and connect to hotspot created by your adapter. You may need a password to connect to adapter WiFi network. Check your adapter manual.
Just in case, Clear RealDash app data, or uninstall/install. Start RealDash. On first start select language, and then go to 'Garage'.
Tap vehicle door and instrument panel. Tap 'Add' on connection list.
Select 'OBD2->WiFi/LAN' You will find IP Address and port settings in your adapter manual. These will vary between adapters. Common settings for Chinese clone adapters are 192.168.0.10 and 35000, but those settings may not work with your adapter. Always check your adapter manual.
Tap to next page until you are in connection settings page. No need to change the settings.
Tap upper left corner 'Done' to go back to the Garage. Exit the Garage.
RealDash will connect to your adapter in a few seconds. Engine must be running to see any engine data.
Note when using WiFi adapters:
If you experience connection loss and reconnect this may be due that your mobile device tries to automatically switch to another WiFi since it detects that adapter WiFi has no Internet connectivity. This automatic switch can be disabled from device settings. The location of the setting varies between OS version and device.
Via Bluetooth on iOS:
Just in case, Clear RealDash app data, or uninstall/install.
Turn Bluetooth on from your device.
Insert adapter to your vehicle OBD2 port and turn ignition on, or start the engine.
Pair your Bluetooth adapter with your device.
Open RealDash, on first start select language, and then go to 'Garage'.
Go inside the vehicle and tap the instruments.
Tap 'Add' on connection list.
Select 'OBD2->Bluetooth->' until you are in connection settings page. No need to change the settings.
Tap upper left corner 'Done' until you are back to Garage.
Exit the Garage into dashboard.
RealDash will connect to your adapter in a few seconds.
How to improve OBD2 connection?
You can try to improve the performance by enabling two optimizations for OBD connection.
Go to 'Garage->Connections' and select your OBD2 connection settings.
The 'Use Multipid Request' will increase the data rate on newer vehicles that have a CAN bus. It is disabled by default since it will slow down connection time on older (<07) vehicles.
The 'Request Only First Reply' option will also increase the data rate on modern vehicles by requesting information from first available PCM. Many values are available in multiple PCMs and when this setting is disabled, the ELM327 adapter will wait until all PCMs have replied with the data. Again, this setting has no improvement on older (<07) vehicles.
Why I don't see all Megasquirt data in RealDash?
By default RealDash displays the data that is common to all Megasquirt versions. To see data that is specific for your Megasquirt, you have to import the Megasquirt ini file into RealDash settings.
Open Garage and open your Megasquirt connection settings.
Use 'Import Megasquirt INI file' button to select your ini file.
Rest of the data that Megasquirt sends is then listed in "ECU specific" category of RealDash inputs.
Can I connect to Ecumaster EMU with serial cable?
It may work with the Serial TTL adapter but we haven't been able to test this ourselves, so we still recommend using EMU with Bluetooth. Enable Bluetooth data stream broadcast from EMU tuning software.
How to connect to Ecumaster EMU?
Enable Bluetooth data stream broadcast from EMU tuning software.
Pair EMU bluetooth module with your device.
Add connection and set connection source as "Ecumaster EMU" in Garage.
Select your "Connections" as Data Source in RealDash settings.
Why I cannot connect to my Megasquirt 1?
Please note that only the latest 'extra' firmware code is tested/supported with RealDash.
Make sure the connection baud rate is set to 9600.
Try importing your Megasquirt ini file from Megasquirt connection settings.
Why I cannot connect to all ECUs with my iPhone / iPad?
Apple does not allow generic Bluetooth-serial adapters to connect to their products, hence only the ECUs that have known serial-WiFi adapter are listed as compatible with iOS. There is nothing we can do about this limitation unless Apple changes their policy, which is unlikely.
RealDash does not connect to my ECU. I know my adapter/connection works with other apps. What can I do?
You can help us troubleshoot the problem. Here are the steps to enable debug logging and to send the log file to us for analysis.
Go to Settings->Application->Debug Settings and enable debug logging feature.
Go back to dashboard, and let the adapter make connection attempts for a minute or so.
Let the adapter make connection attempts for a minute or so.
Go back to Debug Settings, check that your debug log size is at least 5kb. If it is less, go back to step 2.
Use 'Send to developers' button.
The debug log is uploaded to our server and we can investigate the reason of connection problems. You can now disable the debug logging.
Please send us an email when you have uploaded the debug log file. Since log files do not include any personal information, please note date and time of the log to help us find the correct log file.
How do I customize the OBD2 communication?
Customization of OBD communication is done by editing a xml file. We uploaded the xml file that RealDash uses by default into Dropbox.
In 'Channel description files' folder is a file 'realdash_obd2.xml', which is the RealDash default implementation file. Download it and modify to your needs. Default description file contains comments and some instructions for modifications.
Steps to take modifications into use:
Modify the channel description xml file.
Copy the file into your device.
Use Connection Settings 'Custom channel description file' option to import your xml file.
I'm building a custom hardware and installation. How can I show data in RealDash?
Easiest way would be to transmit a commonly known "AIM 5-byte" data stream into RealDash with serial or Bluetooth connection. For protocol specification, see chapter 3.2 on AIM specification:
http://www.aim-sportline.com/download/ecu/ECU-AIM_Logger_145_eng.pdf
In short, data is streamed in 5 byte packages in following manner:
The first byte is the channel number
The second is always 0xA3
The third and fourth are the channel value, high byte first
The fifth is the sum of the preceding four bytes.
Good thing about this protocol is that you can use the same protocol with AIM displays and dataloggers which accept serial connections. Downside is that it is not the highest performance protocol available, but still, it usually provides decent input rate.
Next you need to create a channel description XML file for RealDash. You can use the VEMSv3 specification file as a reference:
https://www.dropbox.com/sh/0x7blzsd4vfrui3/AACTW3eK3iXYW-FM3iINBzSFa?dl=0
There the file "Channel description files/vems_aim.xml"
The important part in XML file is a channel="#", where '#' must be a same number as first byte in sent 5-byte packages.
After you have the custom XML file, do the following in RealDash settings:
Go to Garage->Connections
Remove any existing connections, just in case
Add new connection, Select Vems V3 as ECU type
Select your connection method (Bluetooth, Serial, WiFi)
On last page, use the button to import the XML file you created earlier.
Accept new connection and go back to dashboard.
How to get all indicator lights and other non-standard inputs to work?
Install an external GPIO box that can receive signals from sensors and indicators. GPIO box can then broadcast this information into your ECU, or directly to RealDash like SPLeinonen PDSX-1 and DashBox.
On modern CAN-bus vehicles, the custom PIDs of these can be sniffed from the car and then modify the OBD2 channel description file (see our FAQ) to read those custom PIDs from OBD2 port.
Please note, that at this point we do not have a list of custom PIDs for any vehicle, and really cannot help finding those.
Tutorial
Using normal, warning and critical levels
Each gauge has its own setting for Range, Warning Level, and Critical Level. These settings can be used to make a live changes to gauge properties while dashboard is running.
Short tutorial on how to make a RPM text gauge with text color changing as RPM rises:
Tap 'Edit' -> 'File' -> 'New dashboard' to create new dash.
Tap 'Add Gauge' -> 'Text gauge'
Select the new text gauge and tap 'Input & Values'
The 'Input & Values' popup contains gauge properties for attached input value, Range, Warning Level, and Critical Level settings. First, lets attach this gauge to engine RPM.
Select Data Source by tapping 'None'
On category select list, select 'Engine/ECU Inputs'
On Input select list, select 'RPM'
Tap 'Select Input' button.
Now you are back in 'Input & Values' popup, lets specify value levels.
Range min and max values are clamping values for this gauge. If RPM is lower than min, gauge displays the range minimum value, and if RPM is higher than Range max, Range max is displayed. Usually there is no need to limit the range of the text gauge, but it is very useful for different gauge types, like Needle gauge.
Set Range to 0 (min), 8000 (max).
The Warning and Critical levels are used for graphical effects only. The idea is that if RPM is lower than Warning Level min, but it is higher than Critical Level min, then gauge is currently running in Warning Level. Same applies to max levels; If RPM is higher than Warning Level max but is lower than Critical Level max.
Critical Level is applied to gauge with same principle. If current RPM is lower than Critical Level min, or RPM is higher than Critical Level max, gauge is running in Critical Level.
Lets set Warning and Critical Levels:
Set Warning Level to 0 (min), 4000 (max).
Set Critical Level to 0 (min), 6000 (max).
Tap 'Done' to close the 'Input & Values' popup.
Now, lets attach a different color for the text gauge for each running level.
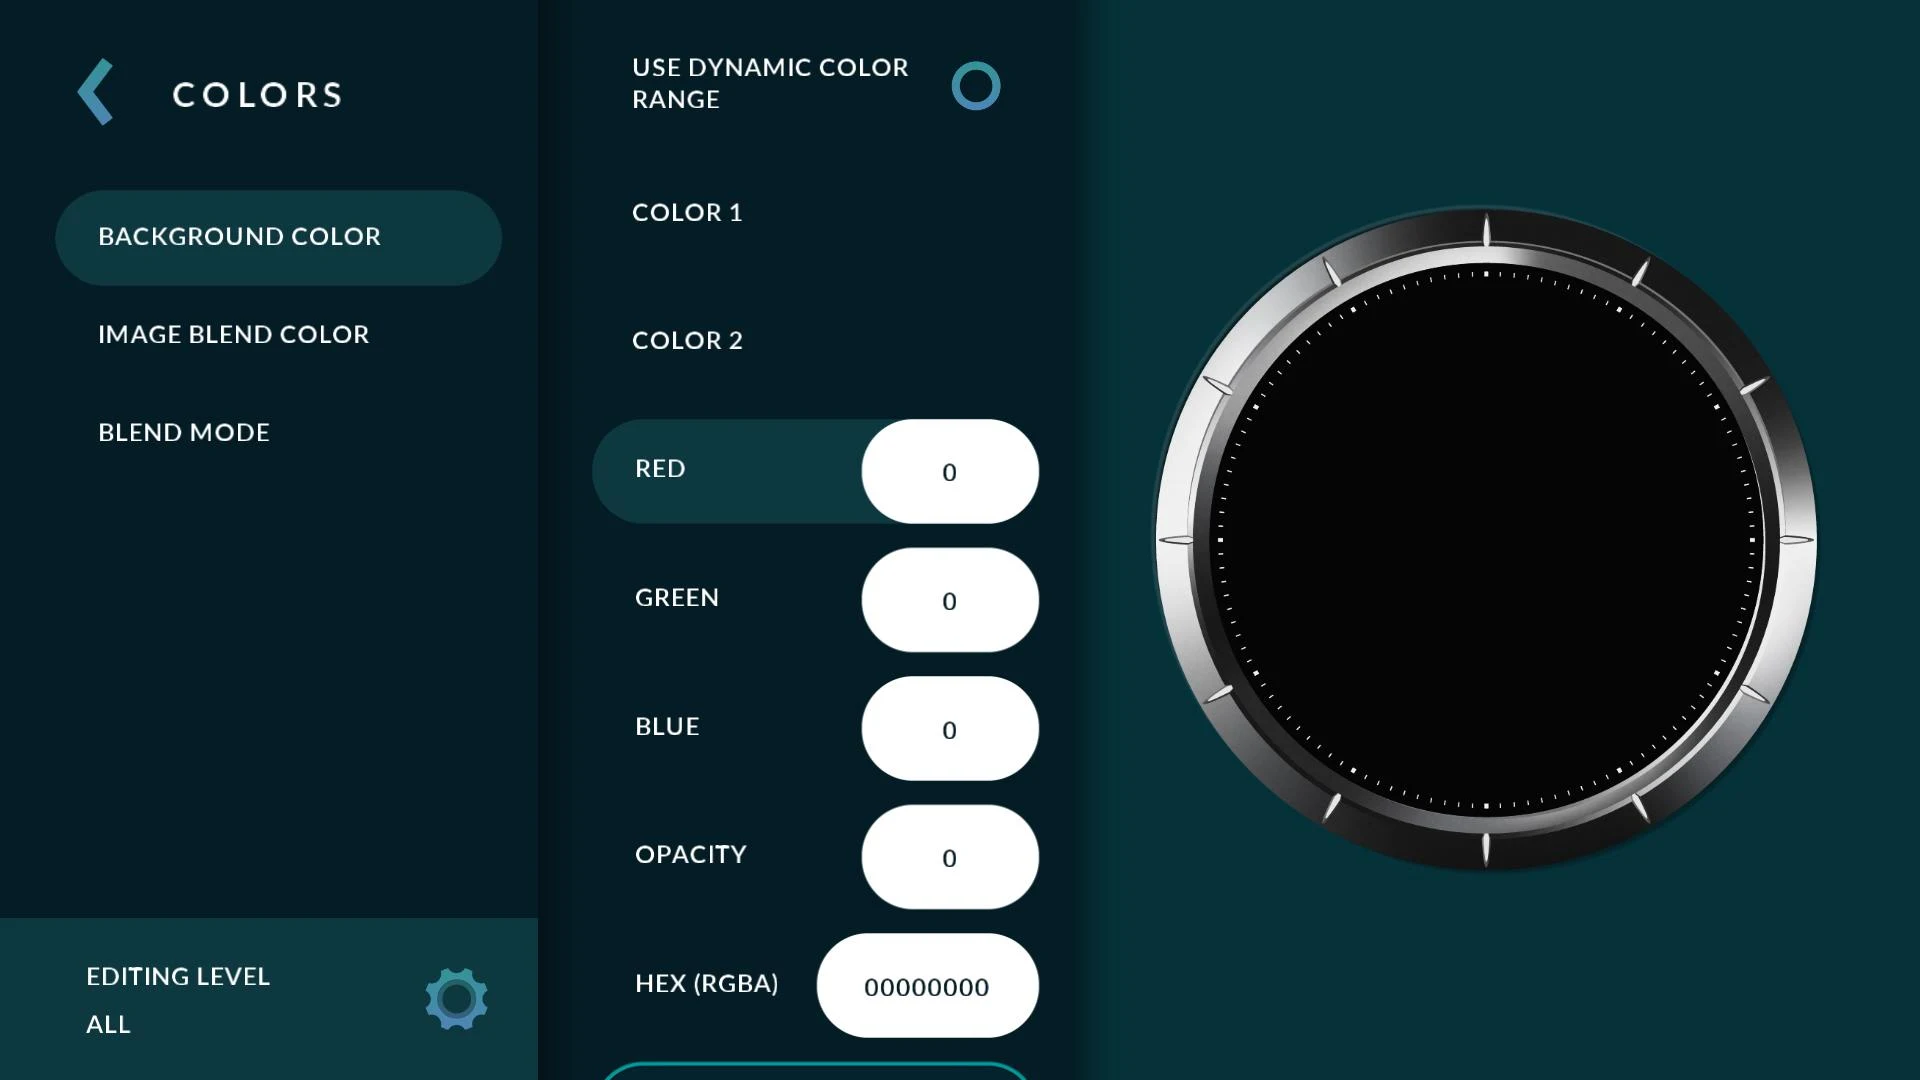
With your gauge selected, tap 'Look & Feel' -> 'Colors' -> 'Text Color'
On Color adjust popup, you see the level selectors at left top of the screen. By default, the level selector is set to 'All'. With this setting, all color adjustments are done to all running levels of the gauge (Normal, Warning, Critical). Lets change the gauge that text is white when in normal mode, yellow in warning level and red in critical level.
Tap 'Editing Level' -> 'Normal', and adjust the text color to white.
Tap 'Editing Level' -> 'Warning', and adjust the text color to yellow.
Tap 'Editing Level' -> 'Critical', and adjust the text color to red.
Tap 'Back' until you are back on dashboard.
All done, now your text changes color as RPM rises. This same principle is used for more complex effects, like blending images with colors etc.
Comments
October 9, 2019 The app has a lot of customisation and it is presented well, not entirely user friendly as I had to scratch my head to figure out how to connect a WiFi odb2. There is lag, and some of the indicators do not work making it all in all a nice effort but pretty useless app Edit. It woul help if you had tutorials for us plebs. For example, I just found out to get the indicators to work I woul have to have the manufacturers PIDs. I think just simple step by step guides would help.
I’ve used this app for a little over a year and I feel like it deserves way more attention. The dashboards included are very good quality, and it’s pretty easy to create your own. There is lots of connectivity, and the actual connection process is rather straightforward. The base version is plenty to get started, and the premium version offers plenty more. Overall, I think this app is great.
The developer has truly done an amazing job. A lot of work went into this and it shows. The only thing I would change is the garage feature. I’m sure it took a lot of time to make but I feel like the app would greatly benefit from just a regular menu instead of a car and garage.
I just mounted my iPad in the car and have this running while driving. Found an awesome display in the gallery for $1.99. Honestly my ONLY complaint is I wish the map would auto-rotate for the direction you’re facing like most other navigation systems. I would love to see this implemented if at all possible.
Infinitely customizable and way better than competing apps. However I am currently slightly annoyed with the developer because there has been no support available since May 2021 -now over a month as of this writing. I paid for premium and I need continued support. I hope the developer is OK healthwise and returns to supporting his application soon. I have developed entire “glass dash” and “Tesla style” car dashboards using this app.
- Versionv2.5.6
- UpdateAug 13, 2025
- DeveloperNapko
- CategoryAuto & Vehicles
- Requires AndroidAndroid 5.0+
- Downloads472K+
- Package Namecom.napko.RealDash
- Signature550b0f56334ef79f7ce9485fcae676a2
- Available on
- ReportFlag as inappropriate
-
NameSizeDownload
-
42.45 MB
-
42.42 MB
-
42.41 MB


Customizability of dashboards
High-quality graphics and interface
Flexible connectivity options (USB, Bluetooth, LAN)
Ability to replace stock gauges
Extensive range of data monitoring capabilities
Responsive customer support
Compatibility with various ECU types
Cost-efficient compared to traditional gauges
Active development and updates
Lack of comprehensive documentation and instructions
Connection issues with OBD-II adapters
Complicated user interface for customization
Limited functionality for some vehicle models
Bugs causing app crashes or disconnection
Additional costs for premium features and skins
Inconsistent performance across devices
Frustration due to lack of basic functionalities like indicator lights
Overly complex setup process for average users