Blink Home Monitor - Home security camera monitoring
Protect your home with Blink's smart surveillance technology.

- 31.0 Version
- 3.2 Score
- 6M+ Downloads
- Free License
- 3+ Content Rating


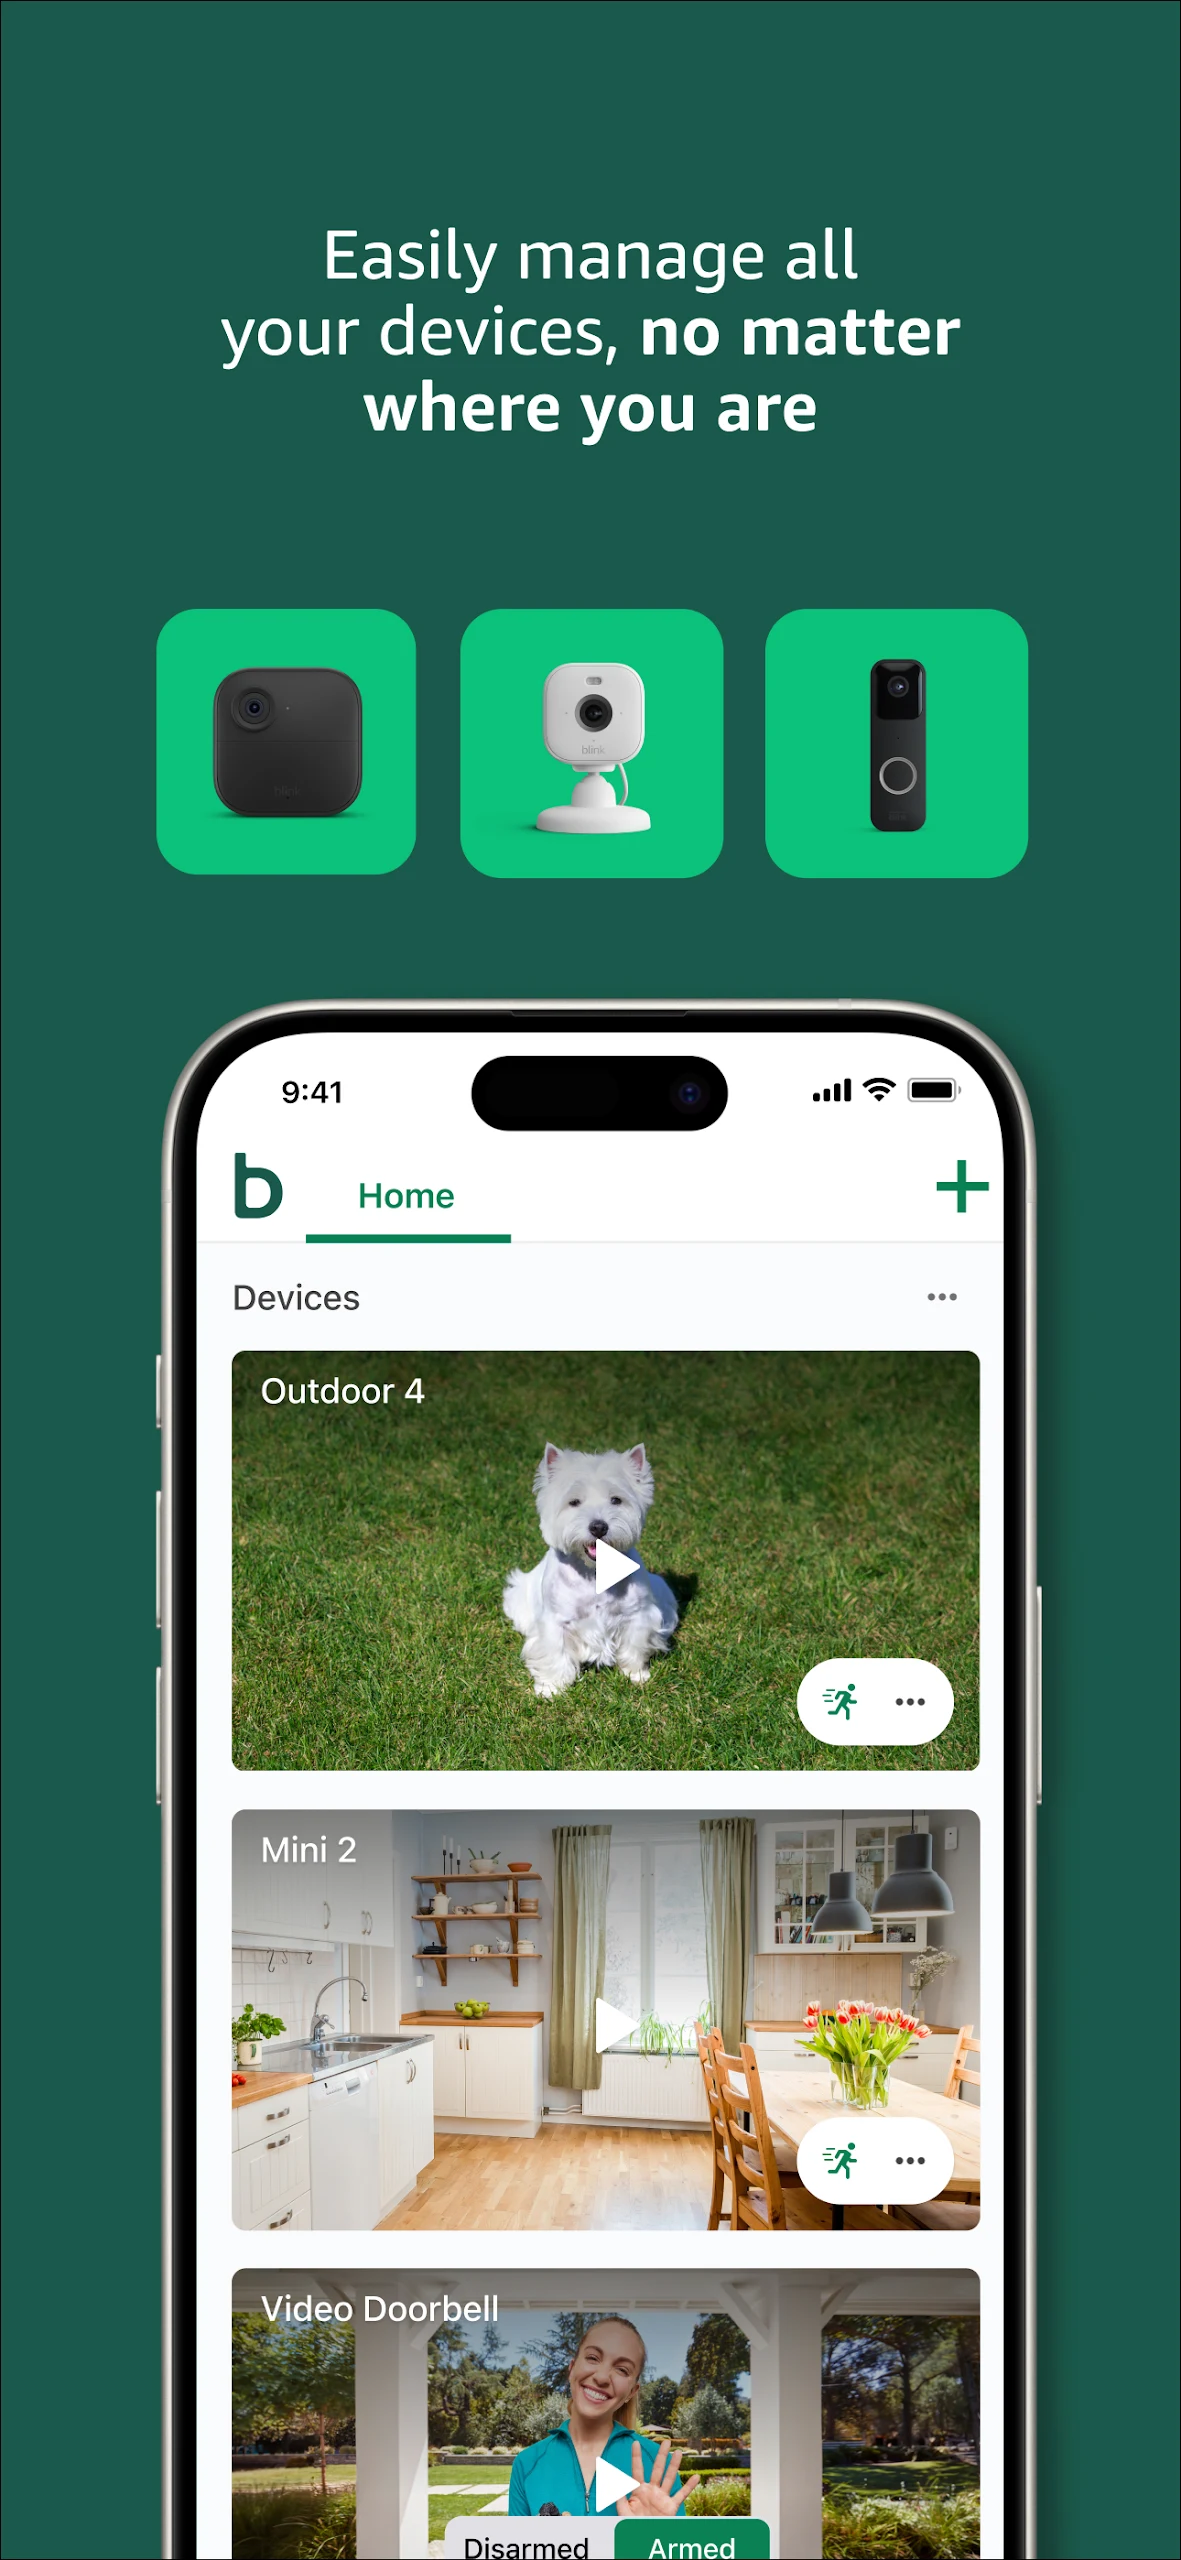

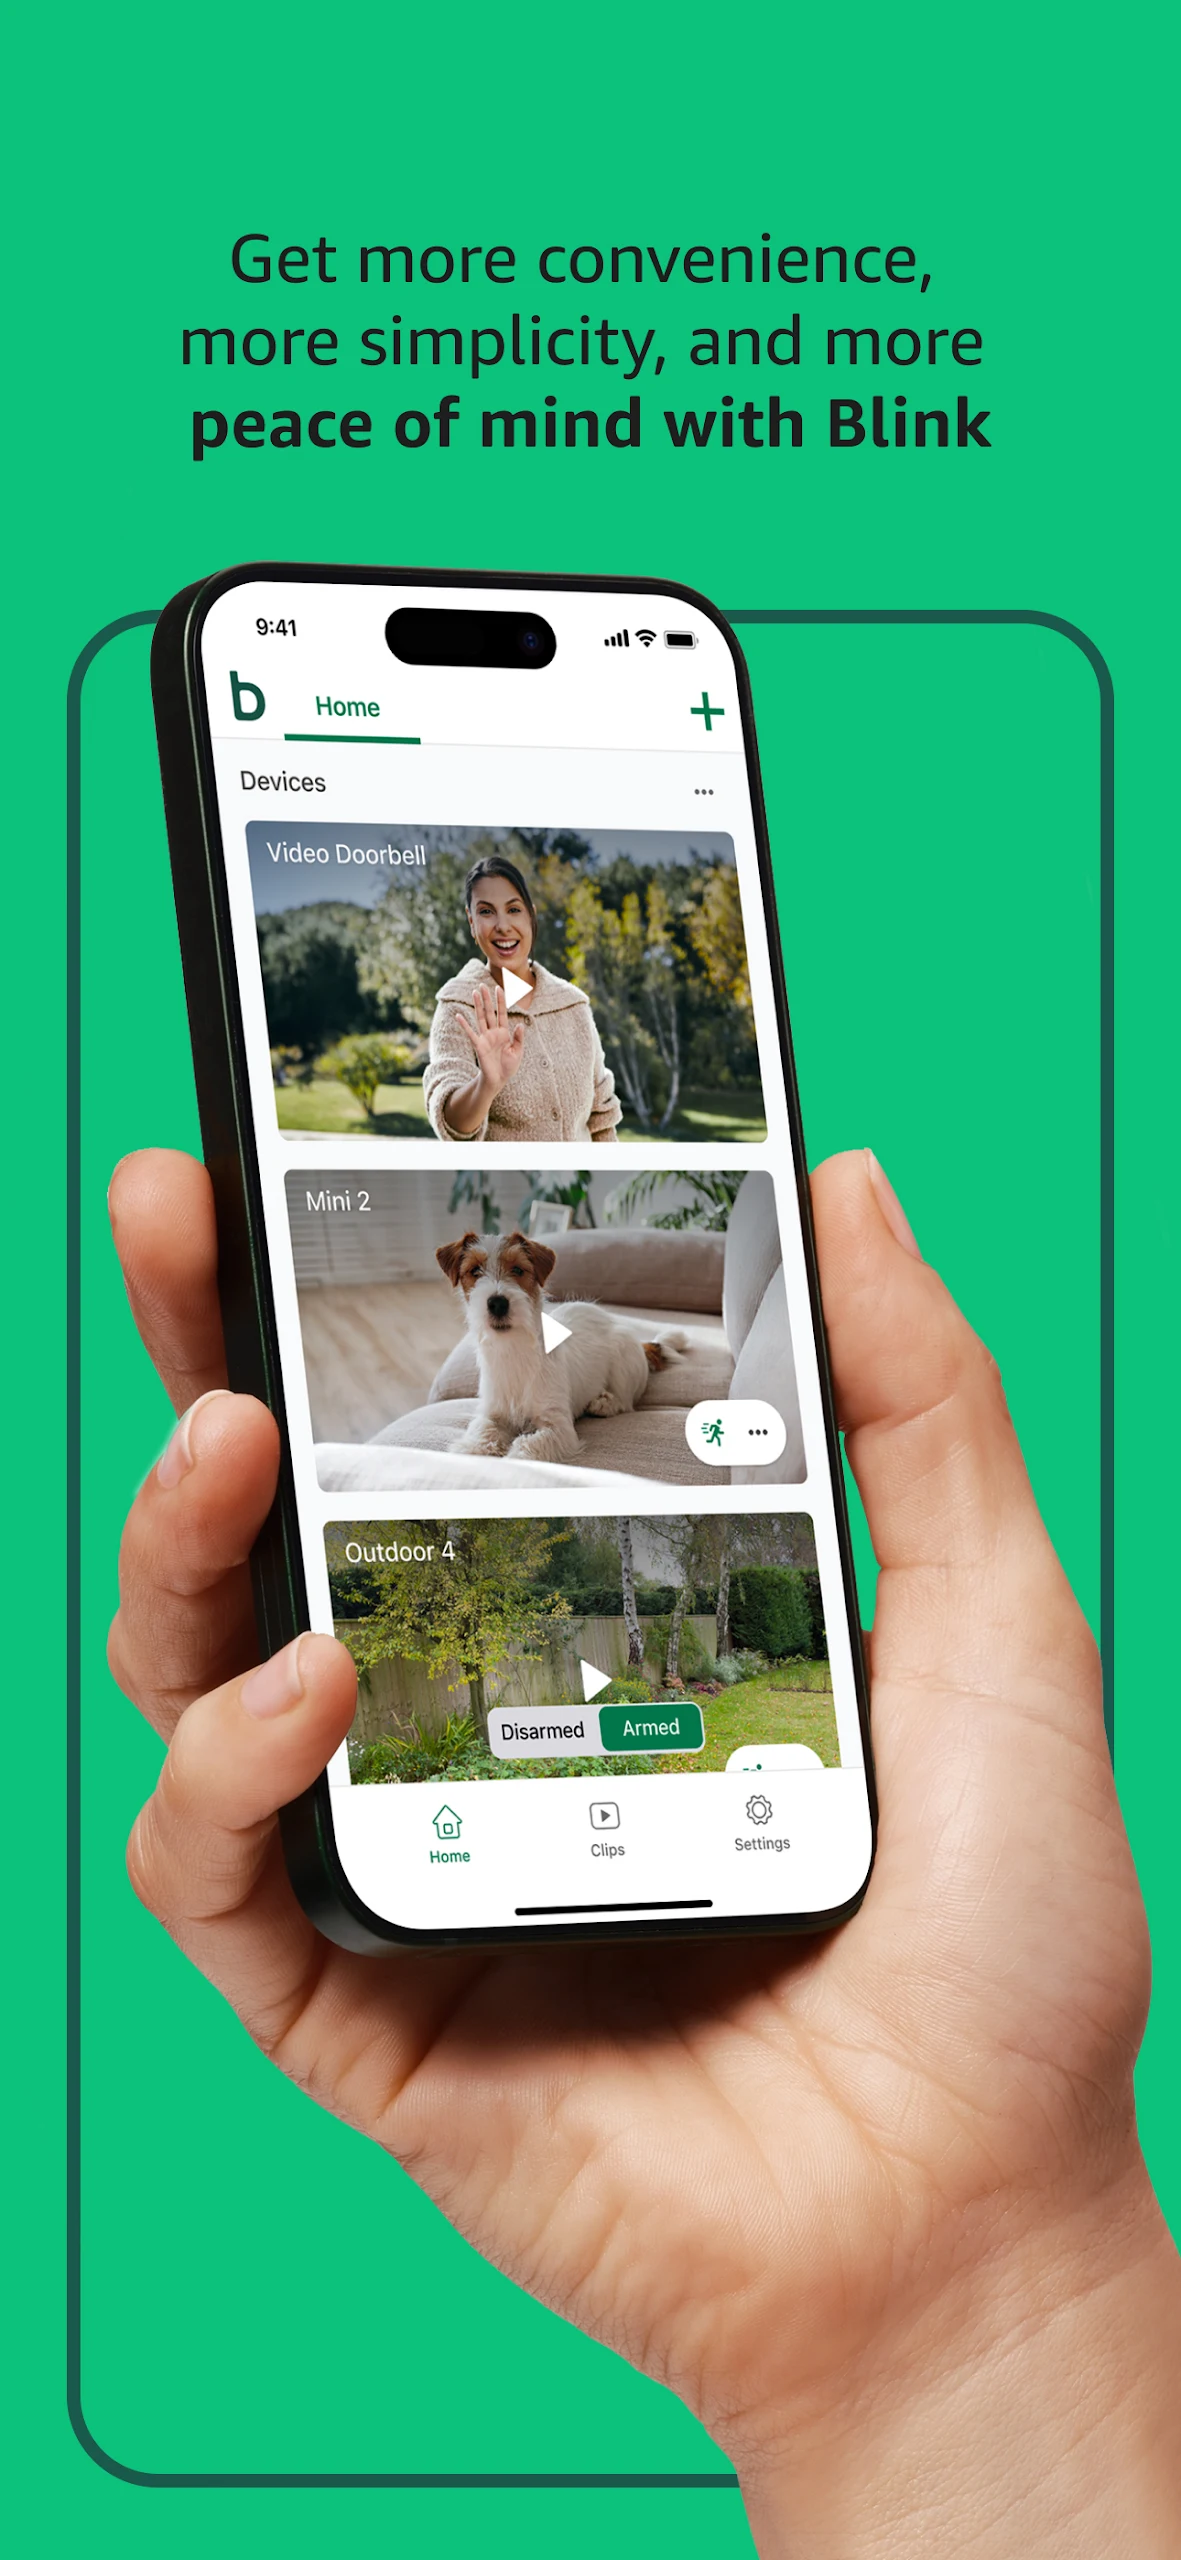
Experience peace of mind with affordable smart home security cameras and systems by Blink, enabling you to monitor your home directly through your smartphone. With multi-system support and a straightforward setup, you can effortlessly manage multiple Blink cameras using a single app. The Blink Home Monitor app ensures you stay informed about important events, whether it's day or night, no matter your location. Just Blink and feel right at home.
Be Everywhere with Blink Smart Home Security Cameras
Blink's latest battery-powered smart home security cameras, in partnership with Amazon, offer flexibility where traditional wired setups fall short! Both Outdoor and Indoor models can operate for up to two years on the provided AA lithium batteries, safeguarding what matters most economically. Seeking a cost-effective plug-in alternative? Look no further than Blink Mini!
Blink Outdoor: withstands the elements so you don't have to. Equipped with features such as two-way audio, motion detection, and more, Outdoor operates for up to two years* on a single set of AA batteries to safeguard your dwelling inside out, rain or shine. Furthermore, Outdoor is compatible with Alexa.
Blink Indoor: a wireless, battery-powered security camera that can be positioned anywhere inside your residence. Enjoy staying connected to occurrences both day and night with features like two-way audio and night vision, regardless of your location. Additionally, Indoor supports Alexa integration.
Blink Mini: compact yet powerful - enabling you to plug it in wherever you desire within your household. Priced affordably from $34.99, Mini provides an excellent initial step towards enhancing your home security. Utilize the Blink Home Monitor app on your phone to listen, observe, and communicate instantly, receiving alerts whenever motion is detected.
Subscription Features
Extended Live View
This feature provides live views up to 90 minutes at a time, without user intervention, for the Blink Wired Floodlight (US only) and Mini cameras.
Unlimited video recordings
All motion detection and live view recordings are stored in the cloud. Clips stay viewable until they're manually deleted or automatically when 60 days old (30 days in the EU/UK).
Auto local storage backup
With a Sync Module 2 and USB drive inserted, copies of any new clips in cloud storage will be backed up to your USB drive every 24 hours.
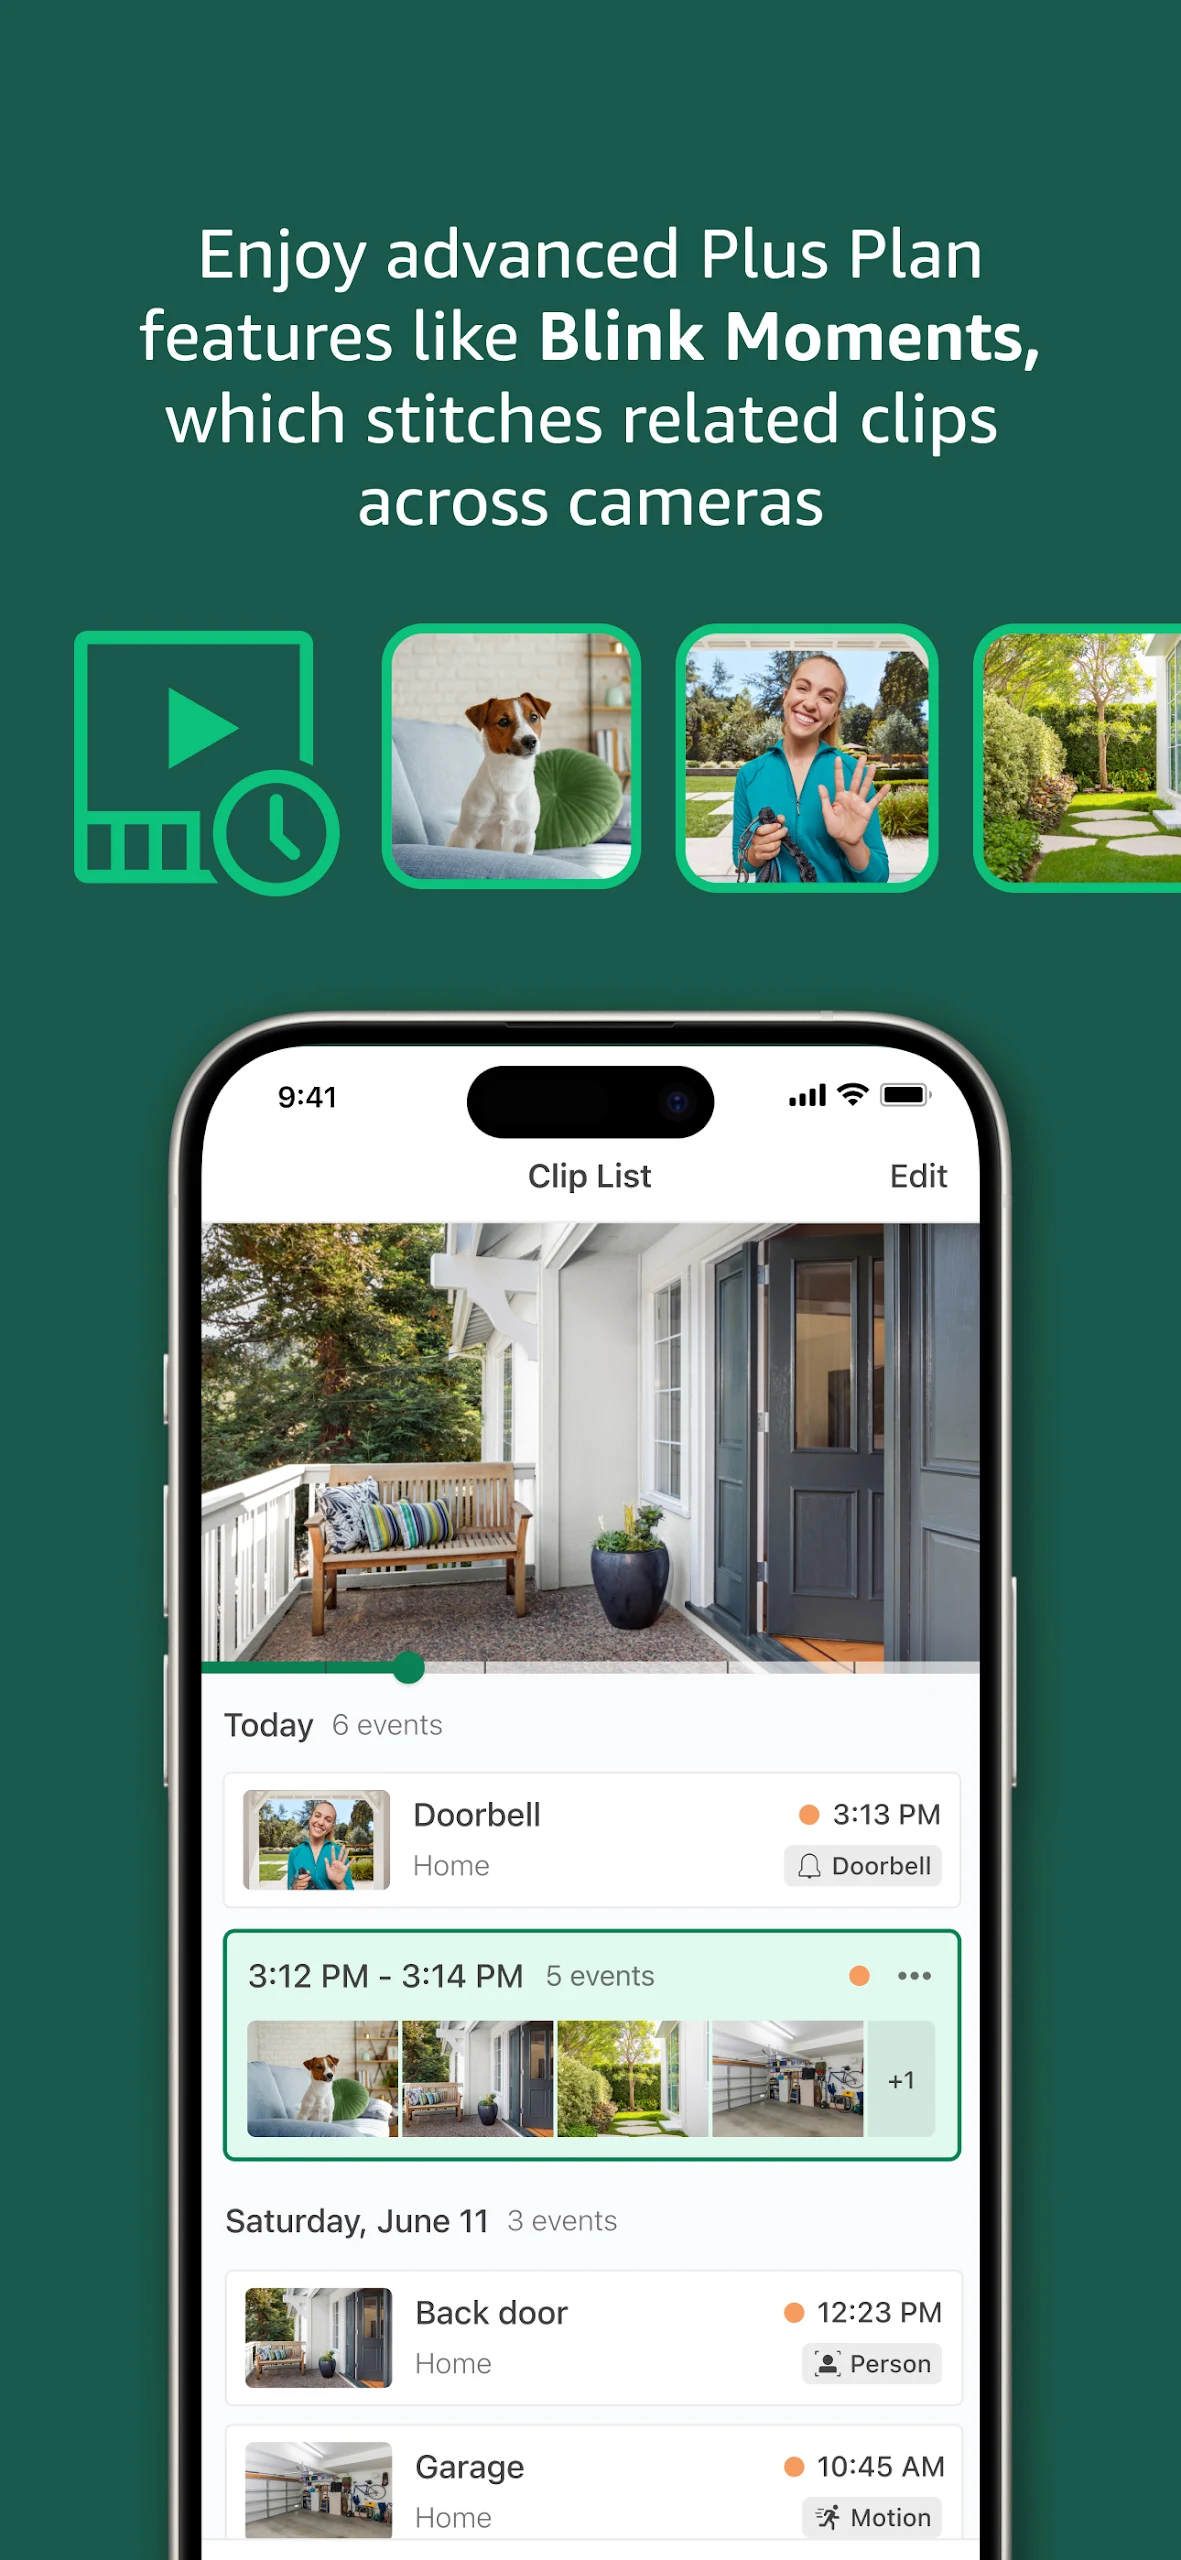
Blink Moments
Blink Moments are automatically created when two or more clips captured by cameras are grouped together into a single continuous video.
Photo Capture
Allows your camera to take a photo every hour while your system is armed, which display in your clip list.
Person Detection
Available for the Blink Mini 2, Outdoor 4 and Wired Floodlight. This feature uses computer vision to detect people.
Custom Snooze Notifications
When you have a Blink Plus Subscription Plan or trial, you can customize your snoozed motion notification times up to 24 hours.
10% off Blink devices on Amazon
Your discount on Blink hardware and accessories is automatically applied at time of checkout when you shop on Amazon, if you're subscribed to a Blink Plus Plan.
Extended warranty coverage (US and Canada)
When you subscribe to a Blink Plus Plan, the extended warranty coverage applies to all of your Blink devices when they're within their original warranty period.
Blink App Issues
1. My Device Won't Scan the Blink QR Code
To add a camera or sync module, you will need to enter its serial number either manually or using your camera to scan a QR code. To scan a QR code, the Blink app requires permission to access the camera on your mobile device.
When after granting this access you experience problems scanning the serial number, try the following to resolve the issue.
Position your mobile device closer to or farther away from the QR code on your Blink device.
It's sometimes necessary to experiment with different distances and angles between your Blink device and camera lens, to obtain optimal focus to scan the QR code.
Adjust the brightness on your mobile device.
If the brightness on your device is set too high or low, you may experience problems scanning the code. For example, if you're in a well lit setting try increasing the brightness, or lower it when in a darker environment.
Disable "Dark Mode"
iOS
1. Open Settings > Display & Brightness.
2. Select "Light" to turn off Dark Mode.
You can also turn off Dark Mode from the Control Center.
Android
1. Open the Settings app.
2. Click “Display” and then toggle “Dark theme” off.
You can also turn off the Dark theme from the Quick Settings.
Move to an evenly lit area.
You will have greater success scanning the QR code in evenly lit environments without bright lights or direct sunlight.
If using a mobile phone, try cleaning the camera lens or using a tablet which has a larger screen.
Scan the QR code on the Blink box label which may produce better results.
2. How to resolve this error message
Depending on how you acquired the device, one of these scenarios may resolve your issue:
1. You added the device to a different account or system in the past.
Do you have multiple Blink accounts and systems? If so, the device may have been added to your other account or a different system. Check your other Blink account and any other systems to see if the device is listed. If it is, you must delete that device from that account. Once it's deleted, you can re-add it to the appropriate Blink account.
2. You were gifted the device.
Did someone give you the device? If so, the device must be deleted from the original owner's Blink account.
If they need helping deleting the camera, they can learn more by visiting gifting your existing Blink hardware.
Once the device serial number is no longer associated with another Blink account, you can add it to your Blink account.
3. You bought the item from an unsupported 3rd party seller.
If you receive a Blink device through an unsupported 3rd party seller (preowned or refurbished), you must contact the original owner or seller and request they delete the device from an existing account.
If they need help deleting the camera, they can learn more by visiting selling your existing Blink hardware.
If you are unable to contact the original owner or seller, Blink Support is unable to resolve this issue and your system is no longer warrantied.
3. Cannot Install or Update Android Apps
The following troubleshooting steps should be taken when you are having problems with installing or updating to the latest version of the Blink Android App.
Settings > Apps > Google Play Services > Clear Data
Settings > Apps > Google Play Store > Clear Data (you will probably have to sign in again so make sure you know your Google credentials)
Settings > Apps > Google > Clear Data (same as above)
Settings > Apps menu > Show system apps > Google Services Framework > Clear Data
Settings > Accounts > Check that "Auto sync data" is turned on
Settings > Accounts > Tap the Google account > Tap Sync Account > Follow steps on screen > Sync now
Settings > Accounts (may be something like "Accounts and Backup") > Tap the Google account > Remove account > Restart device > Go back into the same screen and hit Add Account > Google > re-add it
If the above steps do not resolve the issue, then try the following:
Log out and back into the app.
Delete and reinstall the app from the Google Play Store.
If your device has an SD card, eject and remove it and then re-insert it.
You may also check the following:
That you have a strong Wi-Fi or mobile data connection.
The amount of storage space on your device.
Easy and Effective: Step-by-Step Guide to Blink Home Monitor Installation
Preparing for Installation
Getting ready to install the Blink home monitor can be an exciting experience. Before starting the installation process, it is essential to ensure that all the necessary tools are readily available. These tools include a screwdriver, wifi credentials, and a functioning smartphone with the Blink app installed.
Once all the equipment is available, it’s time to select the best location for the Blink home monitor. The most suitable place should be near a power source, have an unobstructed view, and be away from direct sunlight. This will ensure that the device operates optimally and delivers the best results.
Before connecting the device to the wifi network, it is advisable to have the network credentials nearby to avoid any delays. Once everything is in place, the installation process can begin. Installing a Blink home monitor is straightforward and can be done in a few easy steps, making it one of the most user-friendly home monitoring devices.
So, with the right preparation, the installation process can be smooth, allowing you to enjoy uninterrupted surveillance and peace of mind.
Check for compatibility with your system
When it comes to preparing for installation, it’s important to check for compatibility with your system. This means checking if your hardware meets the minimum system requirements for the software or application you want to install. Failure to check for compatibility can lead to errors, crashes, and other technical issues that could affect the overall performance of your system.
Before installing any software or application, it’s important to ensure that your system has the recommended operating system, processor, memory, and hard disk space required for the software to function effectively. Taking a few minutes to perform this check can save you time and frustration down the line. Remember, prevention is always better than cure, so take the necessary steps to check for compatibility before proceeding with the installation.

Charge the camera
Before installing a security camera, it is essential to prepare all the necessary tools for the installation process. One of the major steps is to charge the camera’s battery fully, ensuring that it can operate efficiently for a long period. Start by plugging in the camera into an electrical outlet and give it enough time to charge fully.
It is advisable to refer to the user manual for the specific charging duration depending on the type of camera you have. A fully charged battery makes sure there is no interruption of surveillance during the installation process, and the camera performs at its best. In addition, charging the camera in advance enables the installer to determine its functionality before the actual installation process ahead.
By doing so, the installer can test the camera angles and position and determine the best location to mount it without any inconvenience. Therefore, charging your camera is a crucial step towards a successful installation, ensuring maximum security for your property.
Download the Blink app
Before you install your Blink security camera, it’s important to download the Blink app to your smartphone or tablet. This app is essential for setting up and monitoring your camera, so it’s important to have it ready to go before you begin installation. You can find the Blink app in the app store on your device, or you can download it directly from the Blink website.
Once you’ve downloaded the app, make sure to create an account and sign in so that you can access all of the camera’s features. With the Blink app, you can customize settings, receive motion alerts, and watch live or recorded video from anywhere at any time. So, take a few minutes to download and set up the app before you begin your camera installation to streamline the process and ensure you get the most out of your new security camera.
Installing the Camera
Are you ready to install your Blink Home Monitor camera? First, determine the best location for your camera, taking into account the range of view and any potential obstructions. Once you’ve found the perfect spot, use the included mounting bracket to secure the camera in place. Next, connect the power adapter to an outlet and plug it into the camera.
The camera should start blinking blue, indicating it’s ready to be added to your Blink account. Download the Blink app, and then follow the prompts to add your new camera to the system. Congratulations! You’ve successfully installed your Blink Home Monitor camera and can now feel secure in monitoring your home while you’re away.
Remember, Blink Home Monitor installation is easy with just a few simple steps to follow.
Find the ideal spot for your camera
Installing the camera in the right location is critical to capturing quality footage. When choosing where to install your camera, consider the areas that require surveillance and what you want to monitor. If you want to monitor your driveway, for instance, you’ll need to place the camera in a location that covers the entire driveway.
Additionally, choose a location that is out of reach of potential intruders to prevent them from tampering with the camera. Finding the optimal height for the camera is also important, as it can impact the quality of the footage. A good rule of thumb is to install the camera at least 9 feet above the ground, which is high enough to prevent people from tampering with it.
Using the right mounts and brackets can also help adjust the camera’s angle and direction to achieve the best angle for capturing footage. By finding the ideal spot for your camera, you’ll be able to monitor your property more effectively and enhance your home security.
Sync the camera with the Blink app
One of the first steps in installing your new Blink camera is to sync it with the Blink app. This is an essential part of the setup process as it allows you to control and view your camera’s feed straight from your smartphone. To get started, first make sure that your camera is turned on and placed in a position where it can connect to your Wi-Fi network.
Then, open up the Blink app and select “Add device.” From here, simply follow the on-screen instructions to connect your camera to your Wi-Fi network and sync it with the app. Once you’ve completed this step, you can start customizing your camera’s settings within the app and enjoying the peace of mind that comes with always having an eye on your home or business.
Connect the camera to Wi-Fi
To fully enjoy the benefits of your camera, you need to connect it to Wi-Fi, which is simple and easy to do. First, you need to ensure that your Wi-Fi is enabled and that you have the correct password. Once you have this in place, turn on your camera and navigate to the Wi-Fi settings menu.
Choose your desired Wi-Fi network and enter the password to connect. Once connected, you may need to register your camera with the manufacturer’s website to access any cloud-based features or firmware updates. Connecting your camera to Wi-Fi not only allows you to transfer photos wirelessly to your computer or mobile device but also gives you access to many other features such as remote viewing, cloud storage, and social media sharing.
By connecting your camera to Wi-Fi, you can unlock a whole new world of possibilities and take your photography game to the next level.
Customizing Your Settings
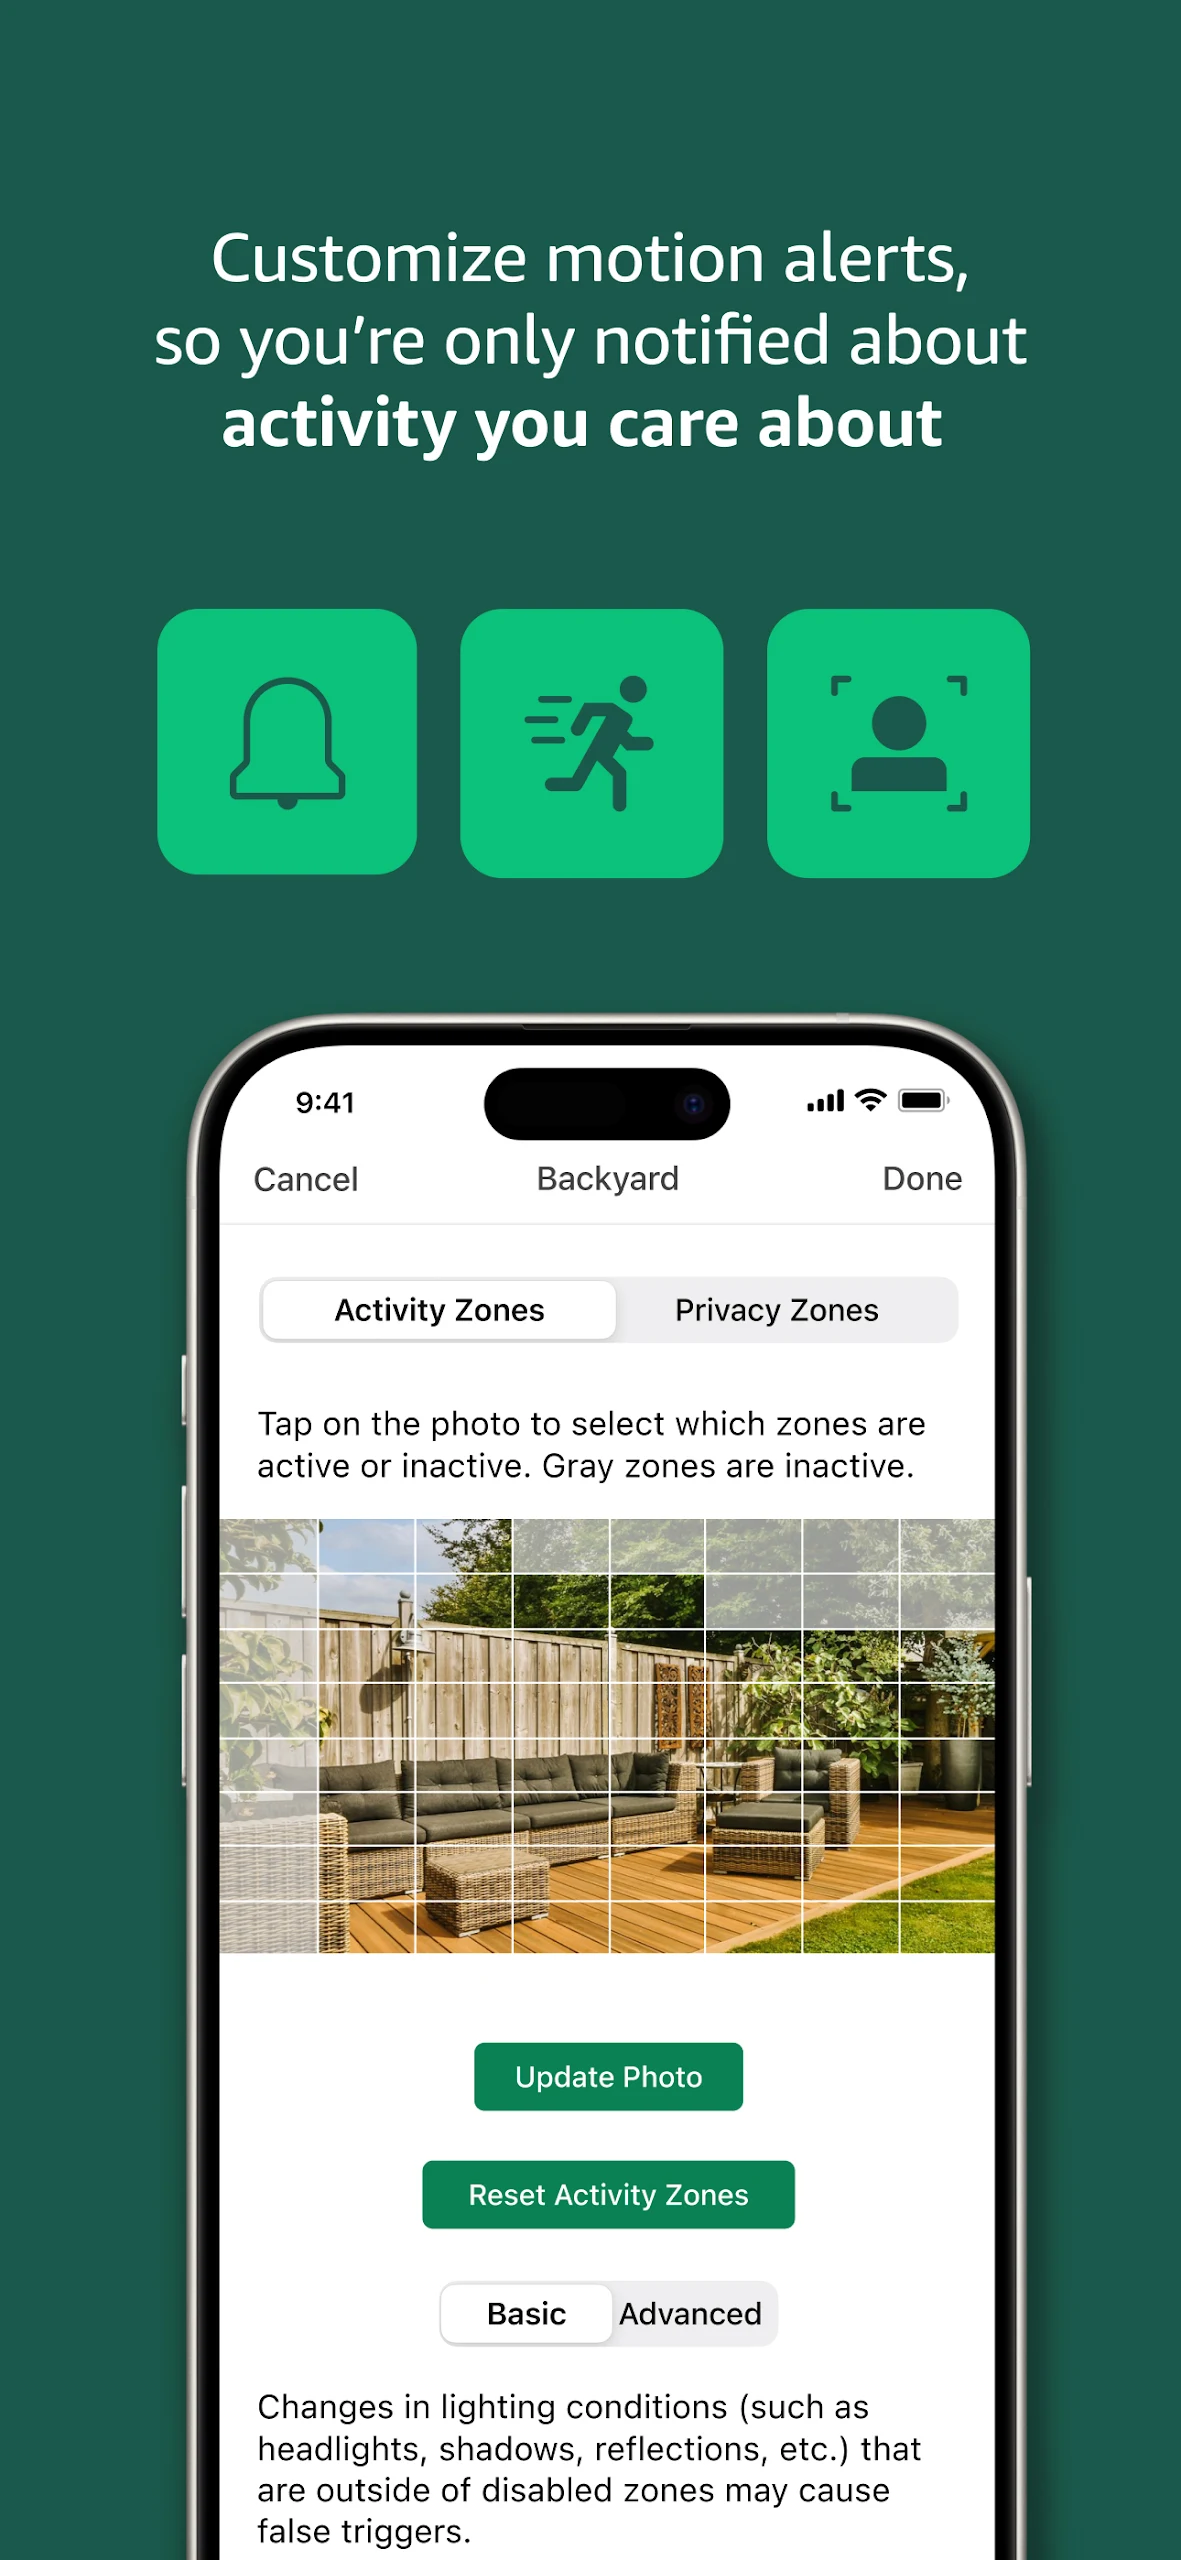
Congratulations on successfully installing your Blink home monitor! Now it’s time to customize your settings for the best experience. Start by setting up motion detection zones in your home. This will help reduce false alerts and only notify you when there is activity in the designated areas.
You can also adjust the sensitivity of your system, so it only triggers alerts when specific motions are detected. Another great feature to enable is the two-way communication function. This allows you to communicate with anyone in the monitored area, providing a level of security and peace of mind.
Don’t forget to check your device’s night vision and audio settings as well to ensure you are getting the clearest picture and audio possible. With these customized settings, your Blink home monitor will keep you and your family safe and secure, giving you peace of mind that your home is protected.
Adjust motion detection settings
Adjusting the motion detection settings of your security system can significantly improve its performance. It allows you to customize the sensitivity levels of the detection sensors according to your specific needs. For instance, if your camera is pointed towards a busy street or highway, you may want to lower the sensitivity to avoid false alarms triggered by passing cars or trucks.
On the other hand, if your camera is focused on a secluded area, you would want to increase the sensitivity to capture any possible intruders. Fortunately, modern security systems make it easy for users to adjust these settings through the camera’s mobile application or web portal. Once you open the settings menu, you can find an option for adjusting the motion detection sensitivity levels.
Most systems also offer a test mode, which allows you to see how the camera reacts and detects movement in real-time. This way, you can fine-tune your settings until it accurately captures the right types of motion. In addition to sensitivity, you can also adjust other settings like motion detection zones.
By defining the boundaries of each zone, you can further customize the types of motion that the camera detects. For example, you can exclude zones like trees, bushes, or roads, which can trigger unwanted alarms. In conclusion, adjusting your security system’s motion detection settings is a critical step in enhancing its capabilities.
With customizable sensitivity levels and zones, you can achieve higher accuracy in capturing important events and minimize false alarms. So, take some time to review your system’s settings and make the necessary adjustments to optimize your security solution.
Set up notifications
Setting up notifications on your device can be highly beneficial, ensuring that you don’t miss out on important information or timely updates. Customizing your settings is an excellent way to stay informed and up-to-date without being overwhelmed by unnecessary notifications. Whether it’s for work, personal life, or both, tailored notifications can save you time and keep you organized.
You can choose to receive notifications for emails, messages, calendar events, and other apps that matter most to you. By using keywords, turning on sounds or vibrations, or selecting specific notification tones, you can easily differentiate between different alerts. When optimizing your notification settings, it’s important to strike a balance.
Notifications can be productive, but you don’t want to be bombarded with irrelevant ones that drain your battery. Take the time to create your own custom notification center that suits your unique needs.
Works Seamlessly with Alexa
Connect your Blink Outdoor, Indoor, or Mini to specific Alexa-enabled devices for voice-activated control in your residence. From streaming live video and playing recorded clips to arming and disarming your camera, receiving motion alerts, and more - all can be executed via simple voice commands.
Experience Hands-Free Management with Alexa!
Elevate Your Smart Home Security
Leverage the Blink Home Monitor app to keep tabs on events transpiring at home from anywhere, anytime. This app links your abode to your phone through high-definition video transmission, empowering you to observe and safeguard your most cherished possessions. Embrace the convenience of multi-system support, enabling you to oversee your primary home, vacation property, or business simultaneously utilizing Blink.
- Version31.0
- UpdateSep 27, 2024
- DeveloperImmedia Semiconductor
- CategoryTools
- Requires AndroidAndroid 6+
- Downloads6M+
- Package Namecom.immediasemi.android.blink
- Signaturedecfde973b9de29defe932d06feca5c9
- Available on
- ReportFlag as inappropriate
-
NameSizeDownload
-
80.49 MB
-
82.95 MB
-
78.79 MB


Users can manage multiple Blink cameras in one app.
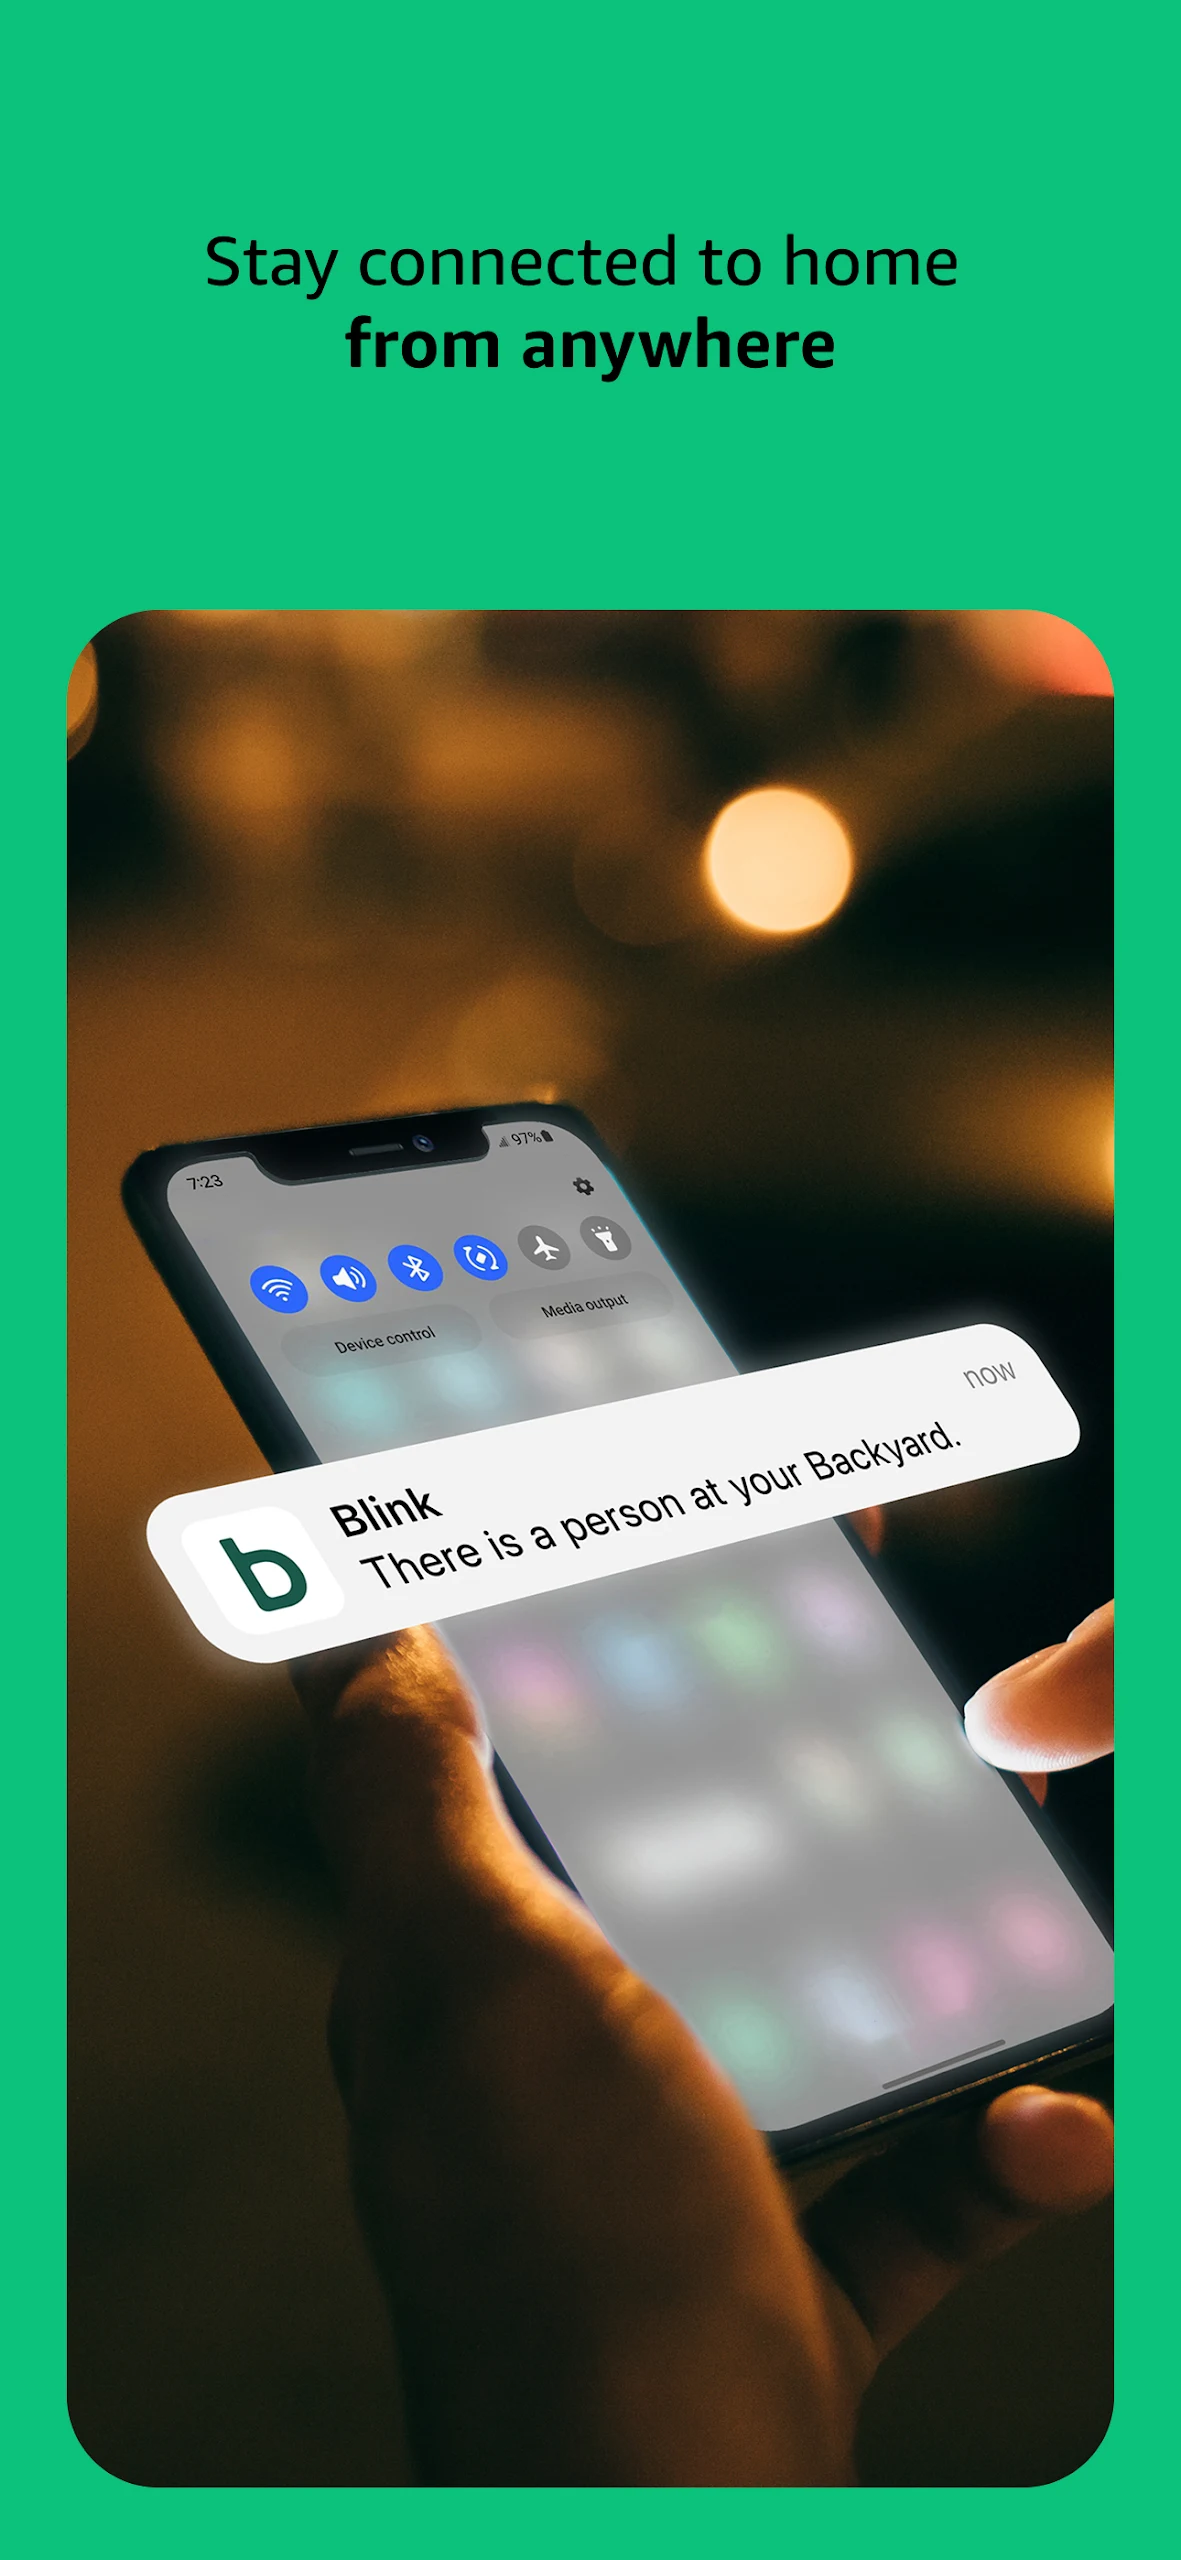
When motion is detected, the app will immediately send notifications to users to alert them to possible intrusions.
Communicate with people or pets at home through the app, which increases interactivity.
Users who want to store videos in the cloud need to pay a monthly subscription fee of $3 or $10.
The free cloud storage is only 60 days, which may not be enough for some users.
Sometimes users may receive delayed motion detection notifications.